- Store
-
Support CenterGuides, License, ContactDownloadDownload installerChat SupportChat with a TechnicianPre-Sales InquiryChat with a Sales Rep
There are many users who need to work on both MacBook and Windows. Most of the drivers are NTFS formatted which is supported by Windows, but there is write support for MacBook. This post looks at various solutions for those who want to make NTFS drives writable on a Mac computer. Here is the list of the three best Mac NTFS writers that can help.
Table of Contents
NTFS or New Technology File System is a process used by the Windows NT operating system for better and efficient file management. It is one of the best file management features that Windows offers and is incredibly efficient. However, one cannot use the NTFS drive for file transfer by Mac devices. In this article, we'll discuss more NTFS drives, their compatibility with Mac devices, and we'll also list some excellent software that you can use to make NTFS drives readable and writable for Mac devices. So without any further delay, let's proceed.
Before learning how to make our NTFS drive writable on Mac, it is crucial to know why we can't write on an NTFS drive while using a Mac device. The answer to that is pretty simple. Mac devices can't because they simply can't. New Technology File System is a proprietary file system that Apple hasn't licensed yet.
That being said, there are a few ways using which you can make your Mac device write on NTFS drives. The simplest way to use an NTFS drive with a Mac device is to format it to FAT32. It is quite an easy process. However, FAT32 isn't as efficient as NTFS, and it comes with certain limitations as well. Therefore, to make Mac devices entirely compatible with an NTFS drive, we have to rely on some third-party software, among which some are of great utility and are entirely safe to use as well. In the next section, we'll be looking at external software that will make Mac devices able to read NTFS drives easily, and we'll also look at a bunch of other ways to do so.
Below are some of the Best Mac NTFS writers that are available for free downloads and are used by thousands of users all over the world:
EaseUS NTFS For Mac Devices
Terminal
NTFS Driver
Let's know more about their features and use cases.
EaseUS NTFS for Mac is a software that basically allows full read-write access to NTFS drives in macOS which are usually unreadable and unwriteable as well. As NTFS drives are something exclusively formatted for Windows, and Apple hasn't licensed that system yet, it is hard for common users to access them when we're using a Mac device. That's when we realize the need for software such as the EaseUS NTFS for Mac.
EaseUS NTFS for Mac is brilliant software that allows us to read and write on an NTFS drive using a Mac device. The thing with external third-party software is that often most of them aren't safe. However, that is not the case with the EaseUS NTFS for Mac. It is an easy-to-use software with a beginner-friendly user interface and is entirely safe to use with almost all of the Mac devices out there. Let's take a look at some of the amazing features EaseUS NTFS for Mac offers:
Step 1. Launch and activate EaseUS NTFS for Mac. Click "I already have a license" to unlock this software.
Step 2. Connect an NTFS drive to Mac, EaseUS NTFS for Mac will automatically detect the device. Select your drive and you'll see it's now marked as 'Read-only". Click "Enable Writable" to add read and write rights to the drive.
Step 3. When the state of NTFS drives turns into "Writable".
Step 4. EaseUS NTFS for Mac will pops up a window to help Mac get access to the NTFS drive:
Step 5. When EaseUS NTFS for Mac restarts, you can then open to check, read, write, and even modify saved data on the NTFS device.
Talking about Terminal, it is a tool for making NTFS drives writable on Mac. Let's take a look at the steps you can follow to gain read/write access to an NTFS drive on a Mac device.
(Replace 'NAME' with the name of the NTFS drive in the following step)
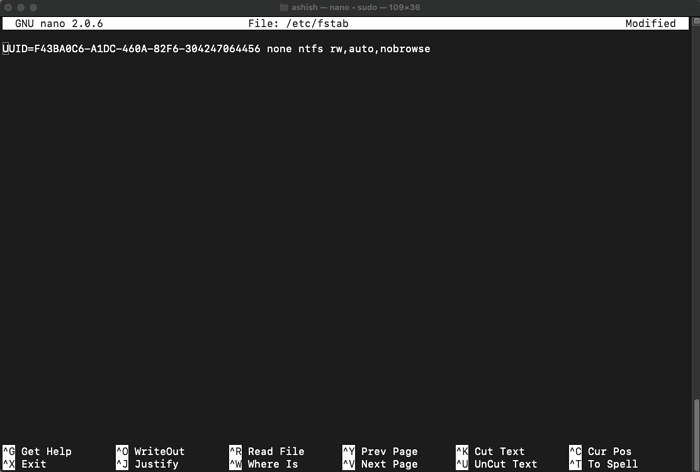
(Note: Prerequisite of step 2, replace 'NAME' with the name of the NTFS drive you wish to read/write)
This is how you can gain read/write access to an NTFS drive using Terminal on a Mac. Before proceeding, let's take a look at the pros and cons of using Terminal for making an NTFS drive readable/writable on a Mac.

There can be two types of NTFS drivers you'll find, paid ones and free ones. Paid ones are easy to install and arguably better in performance, but free ones will also get the job done. Theoretically, one needs to install either of these drivers, and you're good to go. However, with Apple introducing the new System Integrity Protection Feature in Mac devices, installing these drivers can be tricky.
Here are the steps you need to follow to install and set up third-party NTFS drivers. This method disables the system integrity check so the drivers are allowed to be installed. Make sure to enable it once the installation is complete.
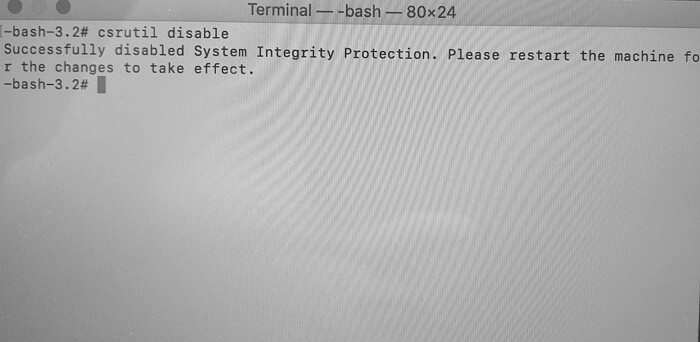
Thus by disabling SIP, you can allow any third-party drivers to work seamlessly.
In this article, we discussed NTFS drives and why they aren't compatible with Mac devices yet. However, despite their incompatibility issues, there are specific ways to gain read/write access to an NTFS drive using a Mac device, including external software, Terminal commands, and NTFS drivers. Using Terminal is a messy process, and it doesn't give you full functionality while using NTFS drivers isn't safe.
It leaves us with the option of using external software for reading/writing NTFS drives, and that's where the EaseUS NTFS for Mac comes in. It is the only solution you need to read/write NTFS drives on a Mac device, and its friendly UI, simple navigation, quick response time, and great convenience justify that statement.
Related Articles - ALSO ON EaseUS SOFTWARE
NTFS for Mac M1 Free: How to Get Write Access on M1 Mac
![]() Banu/2025-06-26
Banu/2025-06-26
How to Read/Write NTFS Drive on macOS Ventura - 3 Ways
![]() Sherly/2025-07-07
Sherly/2025-07-07
How Do I Read and Write NTFS Drives on Mac? 3 Best Solutions Available to Help
![]() Banu/2025-06-26
Banu/2025-06-26
How to Format FAT32 to NTFS on Mac
![]() Banu/2025-06-26
Banu/2025-06-26
Copyright © 2004 - 2023 EaseUS. All rights reserved.


