- Store
-
Support CenterGuides, License, ContactDownloadDownload installerChat SupportChat with a TechnicianPre-Sales InquiryChat with a Sales Rep
Is the hard drive on your Mac not allowing you to save or edit any files? It is likely that the hard drive only has read-only permission or an incompatible file system. In this article, learn how to change the hard drive from a read-only Mac.
Table of Contents
Hard drives are the cheapest way to save your data, and it doesn’t help if your hard drive refuses to allow you to save or edit files. While it indicates that the hard drive is set to read-only, why that happened can be hard to determine. Most importantly, you need to look for how to change the hard drive from a read-only Mac to resolve this issue.

This article will provide the three easiest methods to remove the read-only status of your hard drive on a Mac. It will also discuss the reasons behind this issue and how you can avoid it in the future.
| Workable Solutions | Aims To | Duration |
|---|---|---|
| Make read-only NTFS hard drives readable and writable with third-party NTFS for Mac software. | 2-4 minutes | |
| #2. Change Permission | Get full permission to read-only hard drive on Mac. | 3-5 minutes |
| #3. Run First Aid | Fix problematic disk drive with read-only issue. | 4-5 minutes |
There are multiple solutions to remove the read-only permission from the hard drive on Mac. These solutions depend on the underlying causes, ranging from changing the file system to running disk utility tools. Below are the three most common answers to how to change a hard drive from a read-only Mac:
As mentioned, Mac does not provide write support for NTFS and only limits it to read-only. So, if the hard drive you are using is formatted with NTFS, you will need to change it to a compatible file system. However, doing so can result in data loss due to the need to format the device. Thus, the best option is to use EaseUS NTFS For Mac.
It is an excellent lightweight tool that allows you to easily mount and unmount NTFS drives on Mac with full permissions. With this tool, you are no longer forced to format your hard drive and can perform all the required operations. Moreover, it is also fully compatible latest Mac devices like M1 and M2, with complete support for macOS 13.
The process to use EaseUS NTFS For Mac to access your NTFS hard drive is very easy and quick. Here is how to change the hard drive from read-only Mac using this tool:
Step 1. Launch and activate EaseUS NTFS for Mac. Click "I already have a license" to unlock this software.
Step 2. Connect an NTFS drive to Mac, EaseUS NTFS for Mac will automatically detect the device. Select your drive and you'll see it's now marked as 'Read-only". Click "Enable Writable" to add read and write rights to the drive.
Step 3. When the state of NTFS drives turns into "Writable".
Step 4. EaseUS NTFS for Mac will pops up a window to help Mac get access to the NTFS drive:
Step 5. When EaseUS NTFS for Mac restarts, you can then open to check, read, write, and even modify saved data on the NTFS device.
If the reason behind the read-only drive is not the file system, then the permissions are likely creating problems. You will need to check the drive permissions and change them if they are set to read-only. On Mac, you can change the permission using either Disk Info or the Terminal. Follow these steps to learn how to change the hard drive from read-only Mac by changing permissions:
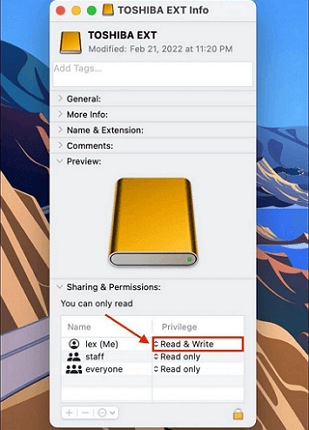
Step 1: Navigate to "Disk Utility" in "Launchpad" on your Mac and select your hard disk. If it isn't showing, click "View" and choose "Show All Devices." After selecting the hard drive, click "File" and choose "Get Info."

Step 2: In the "Get Info" window, scroll to the bottom and tap "Sharing & Permissions." Here you can change the permission to "Read & Write" if it is "Read Only."
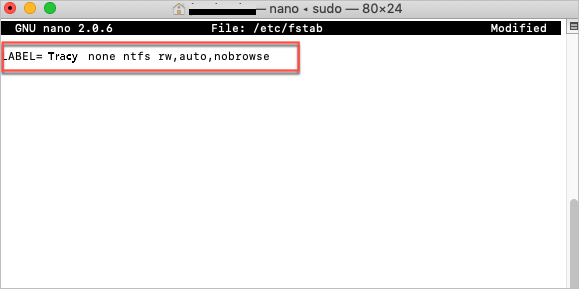
Step 1: Find and launch the "Terminal" from the "Launchpad" of your Mac. Once it is launched, run the "sudo nano etc/fstab" command.

Step 2: Afterward, run the "LABEL=X none ntfs rw,auto,nobrowse" command by replacing "X" with your drive name. Afterward, use "Ctrl + O" to save the file, then "Ctrl + X" to quit Nano. Now remount your drive to use it.
Is your hard drive still showing read-only status? In this case, some internal issues with your hard drive are the likely cause. Depending on its severity, two solutions are available to you. If it is a simple bug, Mac's First Aid tool can fix it. Otherwise, you will need to format the hard drive to restore write access. Use these steps to run First Aid and format the hard drive:
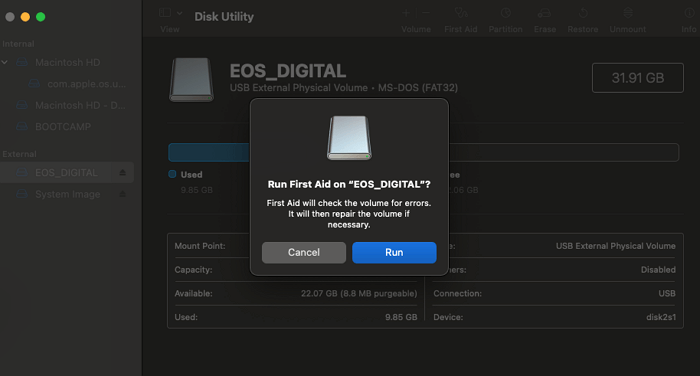
Step 1: On your Mac, click "Launchpad" from the "Dock" and navigate to "Disk Utility." In the "Disk Utility" tab, tap "View" from the top bar and select "Show All Devices."
Step 2: Select your drive and hit "First Aid" from the top bar. Now, press "Run" on the pop-up window and follow the on-screen instructions to complete the process.
Step 3: If the issue isn't resolved by running "First Aid," you will need to format the hard drive. After selecting the drive, select the "Erase" option from the top toolbar and use the on-screen instruction to format your drive with "APFS" as your format and "GUID Partition Map" as the scheme.
What a read-only hard drive means and how it happens must be discussed first before diving into how to change a hard drive from a read-only Mac. If your hard drive is set to read-only, you can only view the files on it. You cannot copy, save, move, or edit files on the hard disk. The reasons behind it are many, and a few of these are described below:
After resolving the read-only issue on your hard drive, you need to ensure it doesn't happen again. If none of the solutions can fix your drive, you will be forced to format it. To ensure it doesn't happen, you should use the following tips to avoid read-only issues on your hard drive:
To wrap things up, issues like read-only mode can occur on hard drives for many reasons. However, the issue is easily solvable, as demonstrated by this article. The article also explained the causes and provided tips to avoid this issue. As for answering the best way to tackle how to change a hard drive from read-only Mac question, EaseUS NTFS For Mac is the recommended choice.
Got more questions about how to change the hard drive from a read-only Mac? If yes, then this part will help you as we have answered some of the FAQs from the internet regarding this issue below:
1. Why is my hard drive read-only on Mac?
The most probable reason for your hard drive being on read-only mode is the incompatible file system. In most cases, hard drives have an NTFS file system which is incompatible with Mac. You will need to change the file system or use a tool like EaseUS NTFS For Mac. Other reasons include permission settings, malware, and physical damage.
2. Why can't I change permission on an external hard drive on Mac?
You cannot change permissions for the external hard drive on Mac for many reasons. The most common is that you lack the administrative privileges to do so. Another reason could be the file system of the external hard drive, as some, like FAT32, don't support permissions. It can also happen if the permission settings of the hard drive are corrupted.
3. How to change Seagate from read-only on Mac without formatting?
Use these steps to change Seagate from read-only on Mac without formatting.
Step 1: Open the "Finder" and locate your external Seagate hard drive. Now right-click the Seagate drive and select "Get Info."
Step 2: Here, find and choose "Sharing & Permissions" to open permission settings. Now change the permission to "Read & Write" in front of your username from "Read-Only."
Related Articles - ALSO ON EaseUS SOFTWARE
How Do I Wipe a NTFS Drive on Mac and Windows [2023 Guide]
![]() Daisy/2025-06-26
Daisy/2025-06-26
Sabrent External Hard Drive Not Recognized Mac | 5 Solutions
![]() Oliver/2025-09-01
Oliver/2025-09-01
How to Put Files on NTFS Disk from Mac
![]() Daisy/2025-06-26
Daisy/2025-06-26
How to Convert NTFS to APFS Without Data Loss
![]() Daisy/2025-06-26
Daisy/2025-06-26
Copyright © 2004 - 2023 EaseUS. All rights reserved.


