How to Lock Files on Windows 11/10/8/7? 3 Best Ways in 2024!
While sending a business document file to your client or business cooperators, locking the file, even setting a password to it, has become a routine in our daily work. Warning! If you haven't locked your documents files yet, it's time.
How Do I Lock a File on My Computer?
If you are still sharing business documents with your client or business partners by directly sending them online or uploading via the cloud? Stay cautious! Your files are being monitored or even used by hackers, file transferring or sharing platforms. So how to prevent your business secrets from leaking? Yes, locking the file and adding a password to the document will work.
So how do I lock a file on my computer in Windows 11, 10, 8, or even 7? There are many file encryption tools, password-protecting software, and tricky methods available online that you can apply to try. However, most Windows users are not quite familiar with file encryption, complex file locking tricks are not suitable.
Here, in this article, we'll cover three normal and efficient ways that can be applied by any level of Windows users to lock their files on their own. Let's see.
How to Lock Files on Windows? 3 Common & Efficient Ways in 2021
Here we connect 3 normal ways that can be accessed by all Windows users to lock and unlock their lies on Windows computers. Let's see:
- #1. Lock Files with Password Protect Software
- #2. Encrypt File with Built-in Tool
- #3. Compress Files via Compressing Tool
Editors' Suggestion:
- To lock files, folders, and even network-shared documents, Method 1 with Password Protect Software works the best.
- To lock your own files and protect them from being mistakenly modified or erased on a local computer, Windows built-in tool in Method 2 can help.
- To send or share an extremely large file, such as a film or video file, you should follow Method 3 as a workout.
So how to lock your files with the respective tools? Follow the respective tutorial below to protect your files immediately.
Method 1. How to Lock Files with Password Protect Software
Duration: 1-2 minutes for file locking
Took: Password protect software - EaseUS LockMyFile.
The reason why we first introducing the password protect software to you is that it does more than a pure file compression tool and file encryption utility. EaseUS LockMyFile does more than locking a file. It does more work for you:
- Hide files, folders on a local hard drive or external hard drive.
- Lock files, folders, and even a local/external hard drive.
- Protect files, folders on local and external disks.
- Lock files on a network LAN shared file and folder.
- Encrypt files, folders to GLF, or EXE files.
- Shred unwanted files and folders on a local or external disk.
How to Lock File with EaseUS LockMyFile:
Step 1. Launch EaseUS LockMyFile, register with your email address and set a software protection password.

Step 2. Click Locking File on the right side. There are three options available: Lock Files, Lock Folder, and Lock Drive.
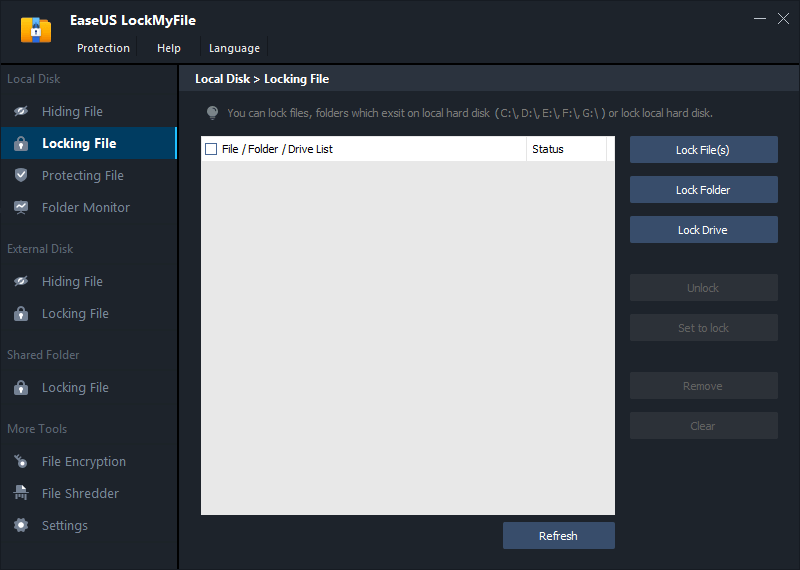
Step 3. Click Lock File(s), and choose the file you want to lock from your computer, and click Open to confirm.
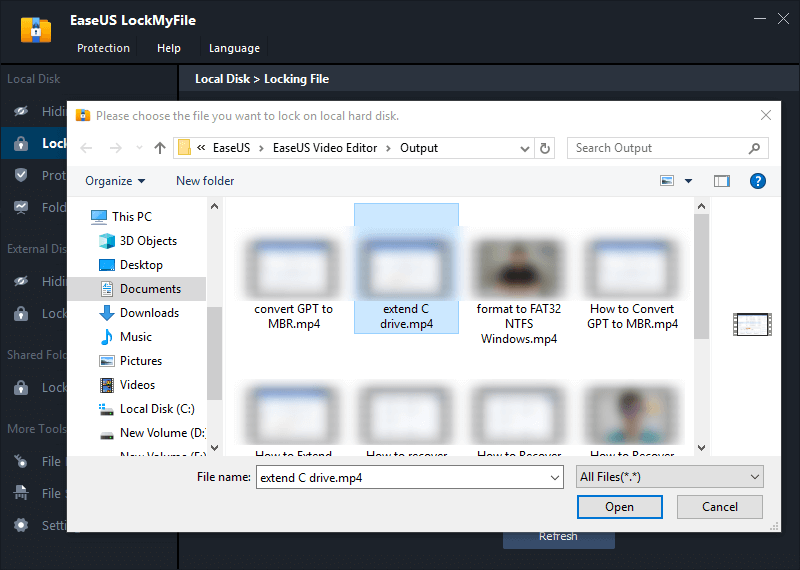
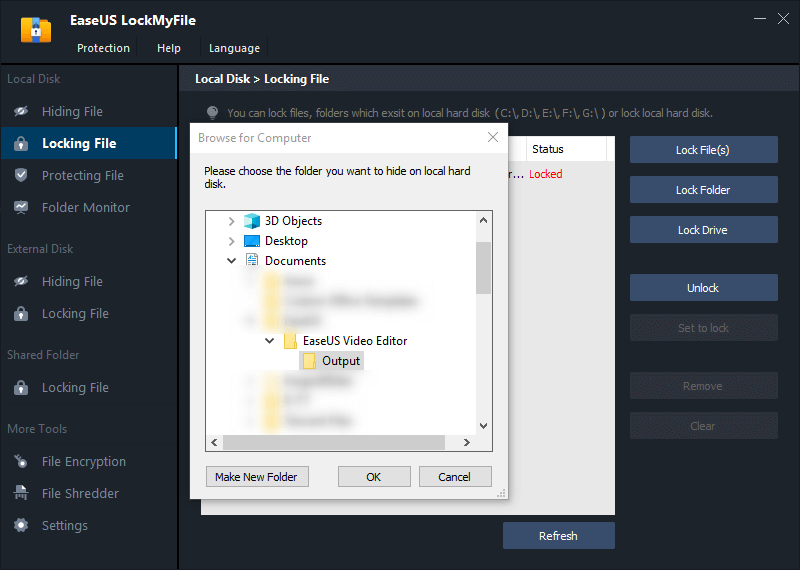
If you need to lock a folder, the operation is the same. Click Lock Folder, choose the target folder, and click OK to confirm.
Step 4. You can check the status of your chosen files or folders now.
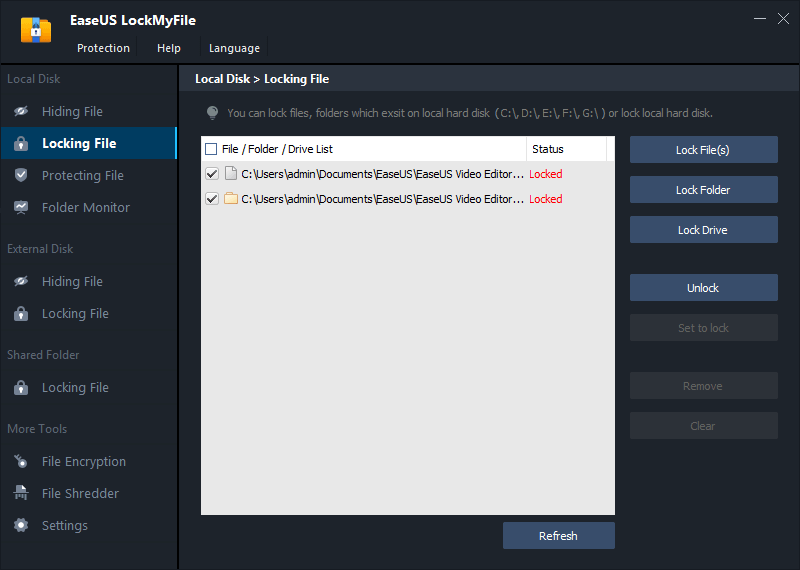
Note: The password is the one that you set up while launching EaseUS LockMyFile. You can also use the password to unlock the files.
Method 2. Encrypt Files via Built-in Tool
Duration: 2-3 minutes
Took: Windows built-in file encryption utility in properties.
Windows added a file encryption feature to keep your files safe. And if you don't want to allow other users to access your important files while using your computer, you can use this tool to lock your files.
How to Lock Files with File Encryption Utility in Properties
Step 1. Right-click the file that you need to lock on a Windows computer, select Properties.
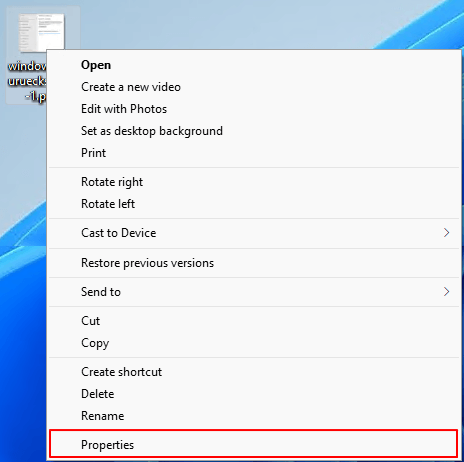
Step 2. On the Properties window, go to General > Advanced > Check Encrypt contents to secure data.
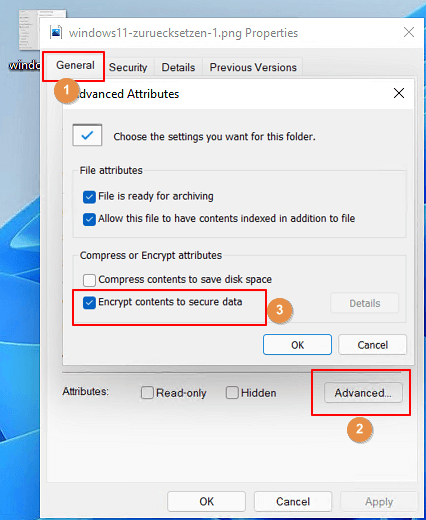
Step 3. Click OK > Apply.
Step 4. Check the encrypt mode: Encrypt the file only and click OK.
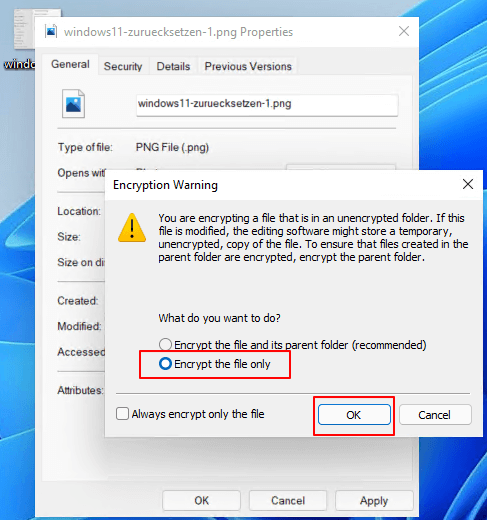
Note: This method locks your files and folders with your current Windows account. When a non-admin account or a second user who tried to access your computer, won't be able to access and uses files.
Method 3. Compress File
Duration: 2-3 minutes
Tool: File compression tool, such as WinRAR, or 7 Zip, etc.
File compression tools are most widely used by Windows and Mac users to lock their files in daily works. Famous compression tools like WinRAR, 7 Zip, are available to download online all the time. You can directly download and install one to compress your files.
How to Compress and Lock a File using WinRAR
Here, we'll show you how to compress and lock a file using WinRAR compression tool. Let's go:
Step 1. Download and install WinRAR on your computer, activate it.
Step 2. Locate and right-click the target file, select Add to archive...
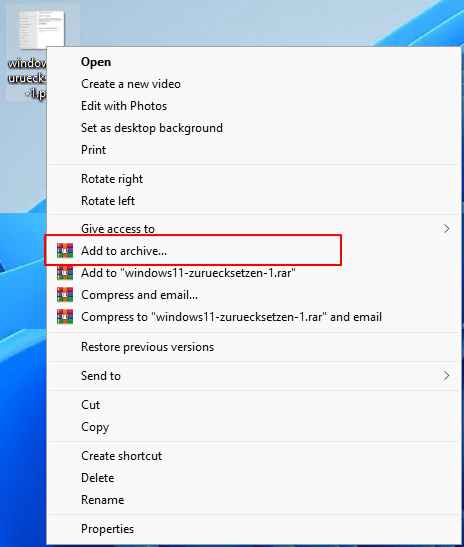
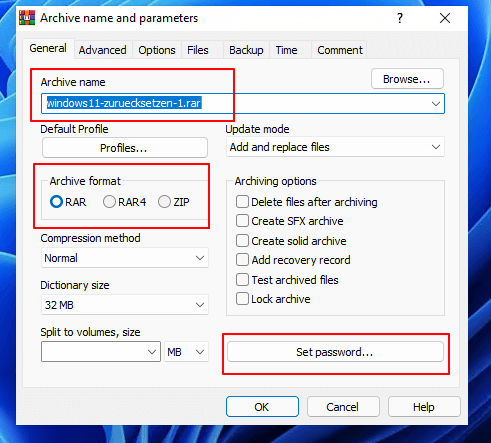
Step 3. Set a name, archive format, size, and click Set password...
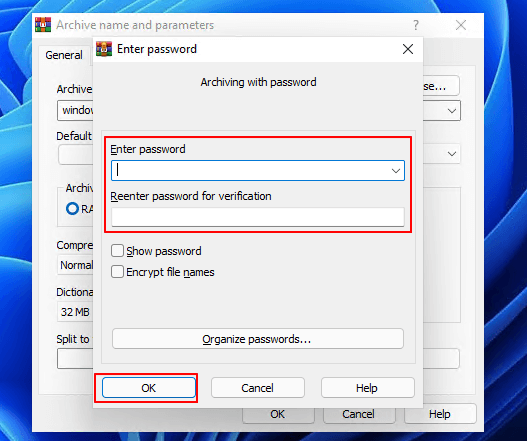
Step 4. Add a password to the file, click OK > OK.
To Lock and Password Protect a File on Windows Is Easy, You Can Do It Alone
On this page, we collected 3 most normal ways that can safely guard your files and business documents immediately. It's important to guarantee that your files are only available on your own computer or just between you and your business partners.
So locking up a file is a must and you can do it on your own now.
- To lock your file, folders on a local or external disk, even network drive, take EaseUS LockMyFile for help.
- To keep your documents safe on your own computer, Windows built-in file encryption utility worthes a try.
- To compress large files, setting a password to protect them, a third-party compression tool is great.
Again, to lock and password protect your files can be easy. Follow the guidelines above to protect your privacy right now. You can do this alone.
Related Articles - ALSO ON EaseUS SOFTWARE
-
How to Lock Drive in Windows 10 with or Without BitLocker
![Jean]() Jean/2025-04-15
Jean/2025-04-15
-
How to Protect Word File from Editing (Windows & Mac) | Restrict Editing on Word Documents
![Jean]() Jean/2025-04-15
Jean/2025-04-15
-
3 Ways to Prevent A File from Being Renamed or Deleted
![Jean]() Jean/2025-04-15
Jean/2025-04-15
-
How to Fix Windows Won't Let Me Encrypt Folder
![Jean]() Jean/2025-04-15
Jean/2025-04-15
