
Want to hide the local disk and let the internal disk drive turns invisible to another user? In this article, you can get four reliable ways to hide internal disk drives.
How to Hide Local Disk with Disk Management
One of the easiest ways to hide a disk drives is to use Disk Management. Follow the steps to see how to hide the internal drives.
Step 1. Press Windows + X and select Disk Management from the pop-up list.
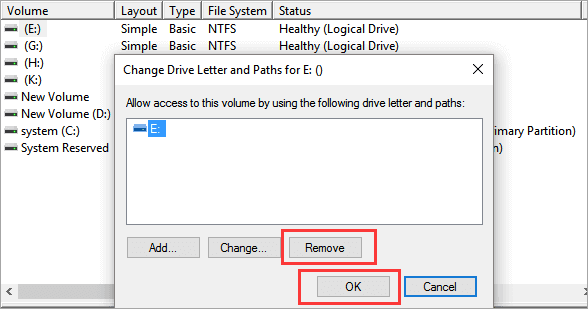
Step 2. Right-click the local disk you want to hide and click on Change Drive Letter and Paths from the list.
Step 3. Select drive and Click the Remove button. The warning windows will pop up, click Yes.
Step 4. Right-click drive without drive letter > Click Change Drive Letter and Paths > Click Add button.
Step 5. On the "Add Drive Letter or Path" window, tick Mount in the following empty NTFS folder. Click the Browse button next to the box.
Step 6. Go to the location you want to create the mount point > Click the New Folder button > Name the folder as you like and click OK.
Hide Local Drive with EaseUS LockMyFile
Hide internal hard drive is an easy task by EaseUS LockMyFile to hide lock disk in several clicks. The hide function is one of the salient features to make your storage device completely invisible to other users. It also works to hide external hard drives. Download the software and use it on Windows 11, 10, 8, 7.
Check more features to encrypt, lock, protect, or monitor data:
- Password protects your important files, folder, or drives. Another user can read the write-protected file, but nobody can delete, modify, or rename it.
- Lock your files, folders, or drives on a local disk, external hard drive, or USB flash drive.
- Set passwords for your LAN shared folder.
- Monitor a folder or a disk when another user tries to change or modify your data.
How to Hide Local Disk with EaseUS LockMyFile:
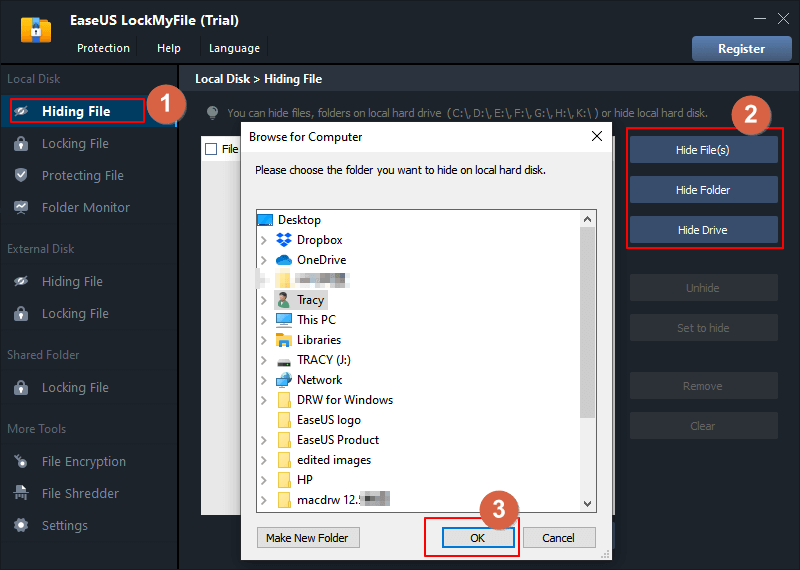
Step 1. Run EaseUS LockMyFile, and select "Hiding File" under the module of "Local Disk ".
Step 2. Click on the "Hide File(s)", "Hide Folder", "Hide Drive" button to select the file/folder/drive you want to hide. Then they will be add to the list. You can add files as many as you want.
Step 3. Click "OK" to start the hiding process.
Using Local Group Policy Editor to Hide Local Disk Drive
Local Group Policy Editor can hide all internal disks or specific drives in Windows 11, 10, 8, 7. But it does not support all Windows versions, such as Local Group Policy Editor is disabled on Windows 10 Home Edition. Follow the steps to hide your local drive.
Step 1. Press Windows + R to open the dialog box. Type gpedit.msc and click OK to open the Local Group Policy Editor.
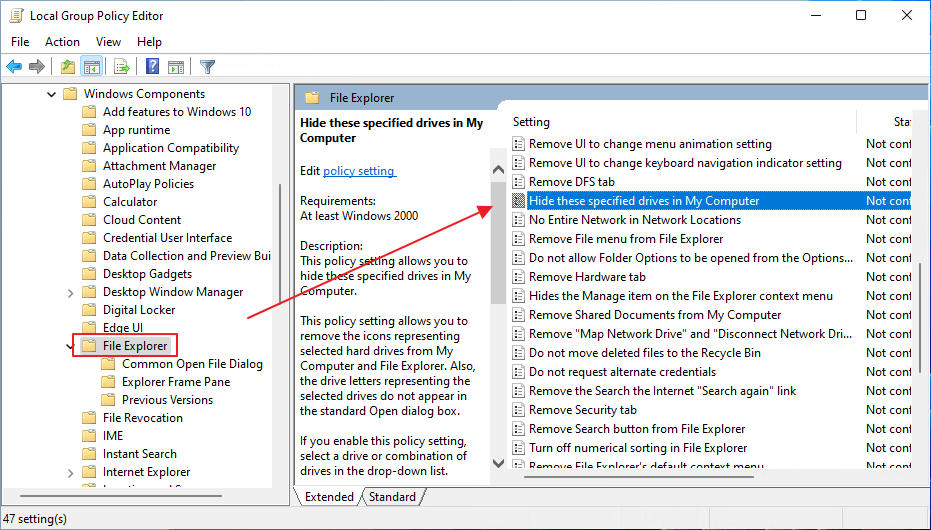
Step 2. Expand Administrative Templates > Windows Components > File Explorer
Step 3. Click on File Explorer and you can scroll down to find "Hide these specified drives in My Computer" on the right panel. Click it.
Step 4. On the "Hide these specified drives in My Computer" window, tick Enable option. And then move to the "Options" part, pick which drive you want to hide (Restrict all drives or Restrict * drive only).
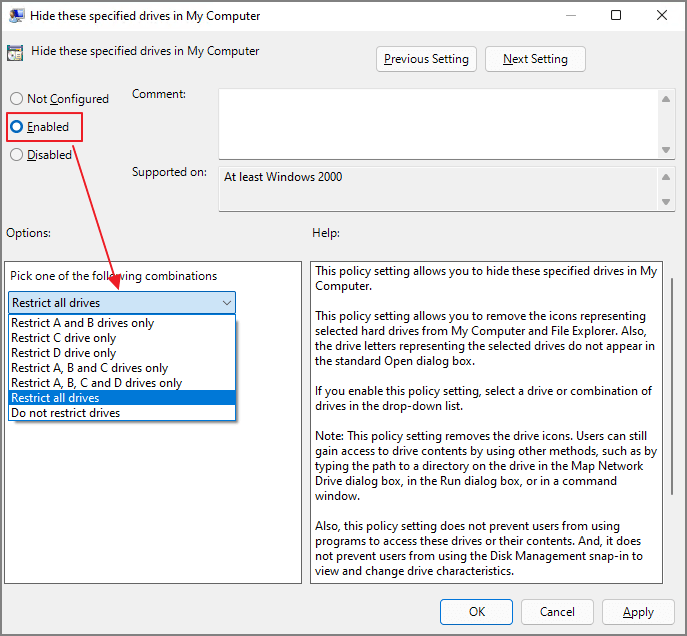
Step 5. Click Apply and then click OK.
Hide Entire Disk Drive with CMD
You can use the Command Prompt to hide the drive. But the command line is much complex than the above method. If you are a beginner, skip this method and get back to the above three solutions.
Step 1. Type Command Prompt in the search box and run the command prompt as administrator.
Step 2. Type diskpart and press Enter.
Step 3. Input each command line and hit Enter.
- List volume
- Select volume *
- Remove Letter *
Step 4. You can see a message like “Diskpart successfully removed the drive letter or mount point”.
Additional Information: Unhide Disk Drive
1. Use Disk Management
Step 1. Open Disk Management, right-click the drive without a drive letter. Click Change Drive Letter and Paths.
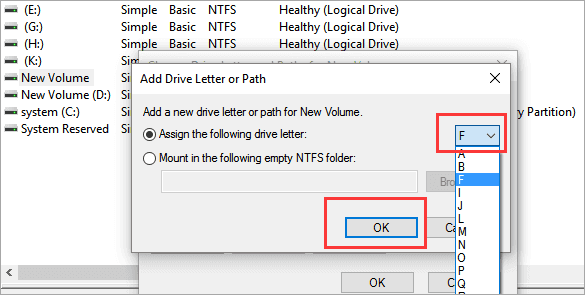
Step 2. Click the Add button. Check to Assign the following drive letter from the pop-up window.
Step 3. Select a drive letter and click OK.
2. Unhide Disk Drive with software
If you have used this third-party software to hide your disk drives, you can reuse this tool to get your drive back. Launch EaseUS LockMyFile on the computer. Select the drive and click Unhide on the right side.
Wrap It Up
Are you successfully hide your files, folder, or drives on your computer? We get 4 quick fixes to hide the disk drive in few clicks. Some tutorials may also tell you to use Registry Editor, don’t take that solution due to the high failure rate. Try quick methods first!
Related Articles - ALSO ON EaseUS SOFTWARE
-
How to Password Protect A Notepad Text File in Windows 11/10 with 3 Ways
![Jean]() Jean/2025-04-15
Jean/2025-04-15
-
Hard Drive Encryption: How to Encrypt a Hard Drive Windows 10
![Jean]() Jean/2025-04-15
Jean/2025-04-15
-
How Can You Password Protect Dropbox Folder on Windows & Mac
![Jean]() Jean/2025-04-15
Jean/2025-04-15
-
[Sloved] How Do I Password Protect Folders/Files in Windows 7
![Jean]() Jean/2025-04-15
Jean/2025-04-15