Table of Contents
USB 3.0 or higher devices are more sought after because they are more than 10 times faster than USB 2.0. If your computer has a USB 3.0 port, using it will make data transfer considerably faster. That makes USB 3.0 not working troublesome as you are forced to use the slow options. USB 3.0 can stop working due to many reasons.
Continue to read the article to find out why your USB 3.0 is not working. It will also explain the most productive solutions to resolve the USB 3.0 not working or USB 3.0 won't work issue.
USB 3.0 Is Not Working, What Are the Causes?
Trying to determine why your USB is not working can be hectic. It's because multiple reasons can lead to your USB 3.0 not working. These reasons range from Windows updates to improper BIOS settings. Below are a few of the most common reasons for this problem:
- Defective USB 3.0 Port: The USB 3.0 port on your computer may have been damaged. It could be the main reason if your computer recently had a fall or liquid spillage.
- Incompatible USB Port: When you connect USB 3.0 drive to a USB 2.0 or 1.0 port, the computer is unlikely to load the drive information for you.
- Windows Update: Many users have reported their USB 3.0 as non-operational after recent Windows 11 updates. So, if you have recently updated your system, it might have changed some permission settings. After-update bugs or glitches can also lead to this issue.
- BIOS Settings: There is a chance that a recent update or another program has changed your computer's BIOS settings. Your USB 3.0 can also stop working if your computer's BIOS driver has become outdated.
- USB Driver: A corrupted or outdated Windows USB driver will lead to your USB 3.0 device not working. The driver can be corrupted due to many reasons, like system crashes or malware attacks.
- Corrupted File System: If your USB 3.0 is not working, there is a chance that its file system has been corrupted. Without a working file system, your Windows will have problems recognizing and processing the USB 3.0 drive.
Also Read: Why USB 3.0 Won't Work?
Quick Fixes for USB 3.0 Is Not Working
Most of the time, when your USB 3.0 drive is not working, the reasons behind it are temporary. These can be easily resolved by changing the USB port or reconnecting the drive. That's why before trying to run complex fixes, you should try these general and quick fixes:
- ✅Reconnect USB 3.0: First, disconnect your USB 3.0 and reconnect it. If this quick fix doesn't work, try changing the USB port. Ensure that the port of your computer you are using is a USB 3.0 port. The USB 3.0 port is generally blue, while USB 2.0 ports are black.
- 👩🏼💻Try Changing the Device: If your USB 3.0 is not working after disconnecting and reconnecting it, try changing the device. Connect your USB 3.0 drive to another computer's USB 3.0 port. If the drive work on another computer, the issue lies with your system. Otherwise, there are some issues with USB 3.0 itself.
- 🧹Clean Up the Junk Data: In case the problem lies within your system, start by clearing all the temporary data and junk files. Either use the Windows inbuilt tools or third-party software but make sure to remove all the junk data, malware, and viruses from your computer.
Complete Guide to Fix USB 3.0 Not Working Issue [4 Reliable Methods with How-To Guide]
If the above-mentioned quick fixes haven't resolved the USB 3.0 not working issue, the problem is likely severe. You don't have to worry because it can be resolved easily as long as it is a software issue. We have chosen the following four methods from the many available online to quickly and safely resolve the USB 3.0 not working issue:
| 5-8 minutes | |
| #2. Update USB Driver for USB 3.0👍 | 2-5 minutes |
| #3. Check and Fix USB File System Error | 3-10 minutes |
| #4. Unlock the USB, Turn Off Write-Protection from USB 3.0 | 3-5 minutes |
When resolving the USB 3.0 problem, try methods 1 and 2 first. These two methods should be able to resolve all the issues. If they don't work, you should use methods 3 and 4.
#1. Enable USB 3.0 in BIOS (Install Latest BIOS Driver]
Has your USB 3.0 stopped working out of nowhere? It can be an indicator of a problem with your computer's BIOS. The issue resides with your computer's motherboard, and you will need to install the latest BIOS drivers to resolve it. You will need to use Command Prompt and BIOS settings to work with this solution. Below are the steps to install the latest BIOS driver:
Step 1: Start by using the "Win + R" key to launch the Run function. Type "cmd" into the Run function and use the "Ctrl + Shift + Enter" key to open CMD as administrator.
Step 2: Use the "wmic baseboard get product, manufacturer" command to find your computer's motherboard and manufacturer's names in the CMD.
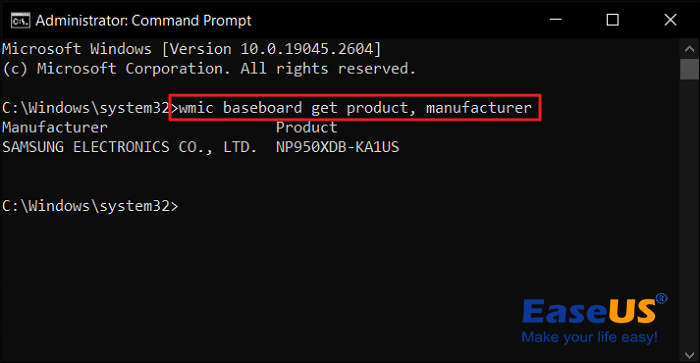
Afterward, search and download new BIOS drivers for your motherboard from the manufacturer's official website.
Step 3: Once the BIOS drivers have been downloaded, copy them to a USB drive. Ensure the files are at the root level in the USB drive.
Now, leave the USB plugged in and reboot your system to enter BIOS settings.
Step 4: Press the BIOS key to enter the BIOS mode when the computer starts to reboot. The key can vary depending on your computer. It can be F11, F12, F8, Del, or Esc. In the BIOS settings, navigate to boot settings.
Step 5: The boot settings differ for each brand and computer model. Follow the on-screen instructions by using the arrow keys to update BIOS. When done, exit the BIOS mode and reboot your system.
#2. Update USB Driver for USB 3.0
Corrupted or outdated drivers are among the major reasons behind Windows's issues, including USB 3.0 not working. If your Windows USB drive has become outdated or corrupted, you will need to fix it. To do that, you will need a tool that saves you from the trouble of searching and installing the latest drivers. EaseUS DriverHandy is a tool developed to resolve all issues regarding Windows drivers in one click.
Key Features in EaseUS DriverHandy:
- ✔️Afterward, download BIOS drivers for your motherboard from the manufacturer's official website. Outdated or corrupted drivers can cause serious issues in your system. EaseUS DriverHandy can automatically scan and repair the problematic drivers in your computer.
- ✔️You can pre-download the important driver using this tool for emergencies. It becomes especially helpful if you live in an area with internet issues.
- ✔️It will download and install only the latest drivers from the original websites. This tool will also ensure that all downloaded drivers are Microsoft certified.
- ✔️This tool can also be used to back up and restore your system drivers. With this feature, you can easily move to a new system will the required drivers.
Steps to Update USB Driver for USB 3.0
EaseUS DriverHandy makes it easy and quick to update Windows drivers for all Windows users. Here is how you can update the USB driver of your system:
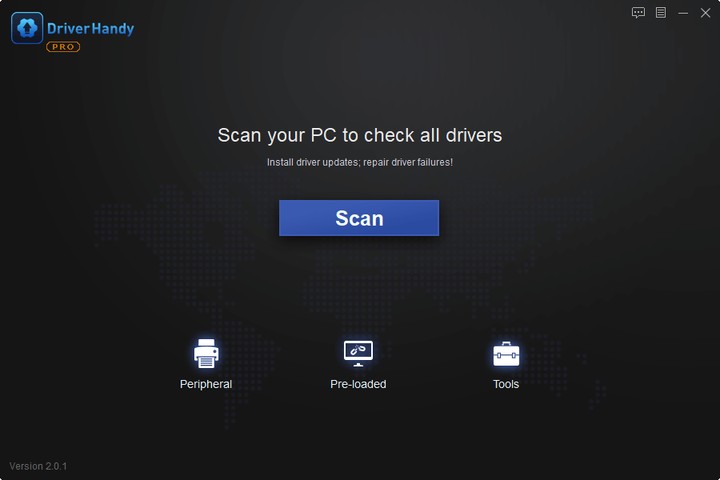
Step 1. Launch EaseUS DriverHandy on your PC and click "Scan" button.
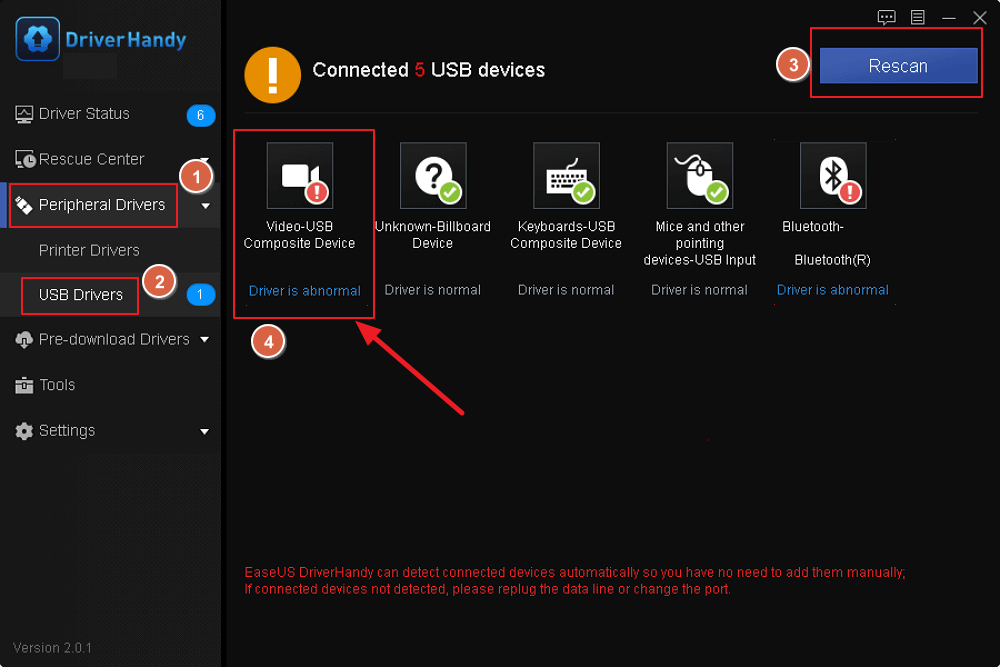
Step 2. Choose "USB Drivers" under the "Peripheral Drivers," and click "Rescan."
Step 3. If there is anything abnormal, navigate to the Driver Statuas and update it by updating the corresponding driver.
#3. Check and Fix USB File System Error
The file system errors on your USB 3.0 can also lead to its malfunction. Luckily, there is a way to fix them using Windows Command Prompt. Windows have an excellent utility called CHKDSK which can help you fix the file system error on your USB 3.0. Use the following steps to check and fix the USB file system errors:
Step 1: Press Windows + R keys, type cmd and click "OK" to open Command Prompt.

Step 2: Now, run the "chkdsk /x /f Z:" command to start the file system repair process. Replace the "Z" in the command with your USB 3.0 drive name.

#4. Unlock the USB, Turn Off Write-Protection from USB 3.0
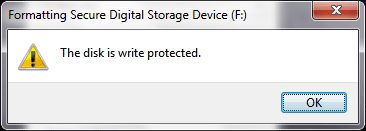
Your USB 3.0 might not be working due to its permission settings. It is possible that you might have unintentionally turned on the write protection on your USB 3.0. If the write protection is on, you won't be able to copy, delete or modify the data on the device. The best tool to turn off write protection from USB 3.0 is EaseUS Partition Master.
It is a specialized tool to solve all the storage drive issues. The tool has a dedicated remove write protection feature which can remove restrictions from USB 3.0. You can download the tool for free and use the following steps to resolve the USB 3.0 not working issue caused by device write protection error:
How to Remove Write Protection from USB Pen Drive
Is your pen drive write protected? This page shows you how to remove write protection from pen drive by using write protection removeal tool, changing the properties settings or using Regedit.exe.
Tips To Keep USB 3.0 Device Working Fine
Once your USB 3.0 not working issue is resolved, take extra precautions to ensure it doesn't happen again. Storage drives are usually fragile pieces of hardware and can become permanently damaged if not taken care of. Follow these tips to ensure your USB 3.0 device keeps working fine:
- Up-to-date USB Driver: Ensure that the USB driver in your Windows stays up-to-date by periodically checking for updates. If it is too much trouble, use a tool like EaseUS DriverHandy.
- USB 3.0 Port: It is also important that you only use USB 3.0 port to connect your USB 3.0 device. You also need to ensure that the port you use isn't damaged.
- Safe Ejection: Do not plug and unplug your USB 3.0 drive without care. Once you connect the device to your system, always click "Eject” to safely remove the device.
- Windows Update: Try to keep your Windows updated to the latest version. Updating your Windows will remove all the bugs from the previous update.
- Malware and Junk Data: Keep a reliable antivirus installed and running in your system to protect it from malware attacks. You should also regularly clean the junk and temporary data to keep the bugs and glitches at bay.
Final Verdict
Knowing how to fix the USB 3.0 not working issue is important, especially if you don't have a better data storage drive. Since the USB 3.0 driver is causing the device to malfunction most of the time, EaseUS DriverHandy can resolve it for you. After downloading and installing this tool, you won't ever face any issues with your system drivers. It will keep them updated and damage-free.
FAQs About USB 3.0 Is Not Working
Do you have more questions about USB 3.0 not working? If yes, this part contains answers to the FAQs about USB 3.0 not working:
1. Why is my USB 3.0 not showing up?
It is possible that you are not connecting the drive to a USB 3.0 port. There is also a chance that the USB port you are using for your USB 3.0 drive is damaged or defective. Your computer's BIOS settings can also be at fault if your USB 3.0 is not showing up.
2. Why is USB 3.0 not working in Windows 7?
Your USB 3.0 device is likely not working in Windows 7 because of the corrupted or outdated driver. You will need to update or reinstall the driver before you can use the USB 3.0 device. Another reason for your USB 3.0 not working in Windows 7 can be a corrupted USB file system.
3. Does USB 3.0 need drivers?
Yes, your computer needs to have a functioning USB 3.0 driver for devices to work. The driver is usually automatically installed when you connect the USB 3.0 device to your system. If it doesn't, you will need to install the driver manually using a tool like EaseUS DriverHandy.
Was This Page Helpful?
Related Articles
-
Guide to Check Driver Status and Update Drivers Automatically [2026 Tutorial]
![author icon]() Banu/2026-01-05
Banu/2026-01-05 -
Why USB 3.0 Won't Work? Check the Causes and Learn How to Fix It Here [2026]
![author icon]() Banu/2026-01-05
Banu/2026-01-05 -
Printer Not Connected? Here Are the Causes and Fixes with How-To Guide
![author icon]() Banu/2026-01-05
Banu/2026-01-05 -
What to Do When Windows Can't Find a Driver for Your Network Adapter Windows 10
![author icon]() Banu/2025-04-15
Banu/2025-04-15
