Deleting everything on NTFS drive Mac Big Sur, Catalina is a tricky task to do on Mac. The guideline helps you delete everything using a disk utility and a third-party utility.
Table of Contents
Apple has released the latest Mac operating system – macOS Big Sur with several superficial enhancements and software updates. This update has left people wondering if they can let the users read-write NTFS on their macOS Big Sur.
In this guide, we will explain how you can write or delete files from NTFS on Mac Monterey, Big Sur, and even Catalina without losing any data.
| Workable Solutions | Step-by-step Troubleshooting |
|---|---|
| 1. Enable Read/Write Mode on Mac | Step 1. Launch and activate EaseUS NTFS for Mac. Click "I already have a license" to unlock this software...Full steps |
| 2. Erase Everything on Disk Utility |
Step 1. Create a backup of all your important files and documents from your NTFS to avoid any loss of essential data...Full steps |
For a very long time, Apple users have wanted the developers to update the Mac device, which is why Apple released its most extensive update called the Mac Big Sur. This update has everything a user would demand and set some high-efficiency bookmarks. However, it still does not let its users evade NTFS and shows a non-compatibility with the NTFS drive. By default, you can read NTFS drive on Mac; you cannot edit existing files nor copy or delete any files from NTFS on Mac Big Sur.
If you are unable to delete files from NTFS the possible reason behind it is your NTFS file system is not licensed. To use NTFS on Mac, Apple needs a license to use it on Macs they sell. It means to utilize the open-source NTFS format fully; Apple would have to pay a massive licensing fee to their competitors.
Solution: You can enable to write an NTFS drive via an NTFS mounter and delete everything, or directly format an NTFS drive to other file systems.
One way to enable read/write mode on Mac is by utilizing the benefits of third-party software. Third-party software will automatically add a processor on your computer that will process all the read-write details with Windows features and formatting power.
EaseUs NTFS for Mac has proven to be professional with the highest performance that lets you easily make NTFS writable on Mac. This third-party software enables macOS to mount, read, write NTFS drives on Mac.
This handy tool is super easy to use with a user-friendly interface to allow NTFS formatting for Mac users on their drives. Some exceptional features of this tool include:
To professionally and securely handle your NTFS, EaseUS NTFS for Mac is proven to be one of the most in-demand software. It is super fast, and with its straightforward interface, you can never get confused during the formatting process. You can download, install and run EaseUS NTFS for Mac on your Mac Big Sur device. Follow the instructions mentioned to access your NTFS external drive in Big Sur, Catalina devices for free.
Step 1. Launch and activate EaseUS NTFS for Mac. Click "I already have a license" to unlock this software.
Step 2. Connect an NTFS drive to Mac, EaseUS NTFS for Mac will automatically detect the device. Select your drive and you'll see it's now marked as 'Read-only". Click "Enable Writable" to add read and write rights to the drive.
Step 3. When the state of NTFS drives turns into "Writable".
Step 4. EaseUS NTFS for Mac will pops up a window to help Mac get access to the NTFS drive:
Step 5. When EaseUS NTFS for Mac restarts, you can then open to check, read, write, and even modify saved data on the NTFS device.
This method involves working closely with your Mac device. The main benefit of using this method would be that you do not have to use any third-party software, and you can quickly follow this method.
Tip: Take a backup of your necessary data
Once you have made a backup of your essential data, you can follow these simple steps to erase NTFS on your disk utility.
Step.1
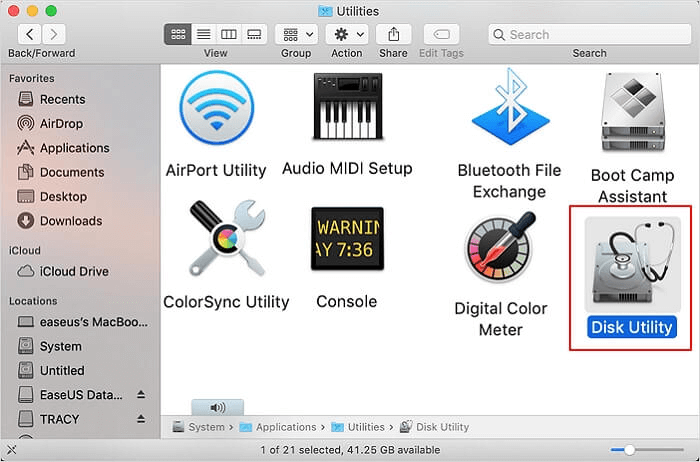
Create a backup of all your important files and documents from your NTFS to avoid any loss of essential data. Go to Applications, select Utilities, and then click on Disk Utility.
Step.2
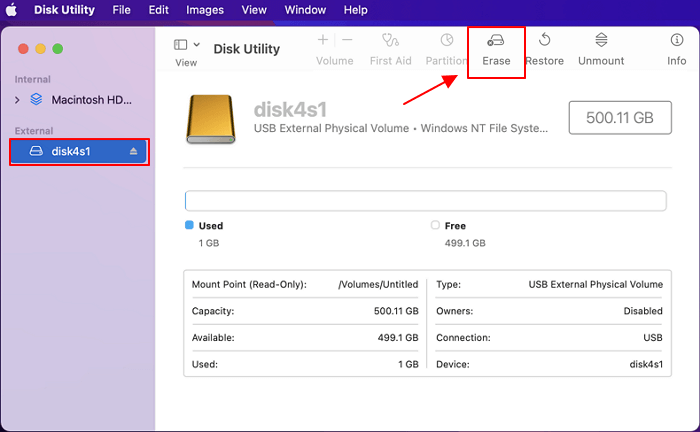
From the sidebar, select the NTFS drive.
Step.3
Once you have selected the NTFS drive, click on Erase.
Step.4
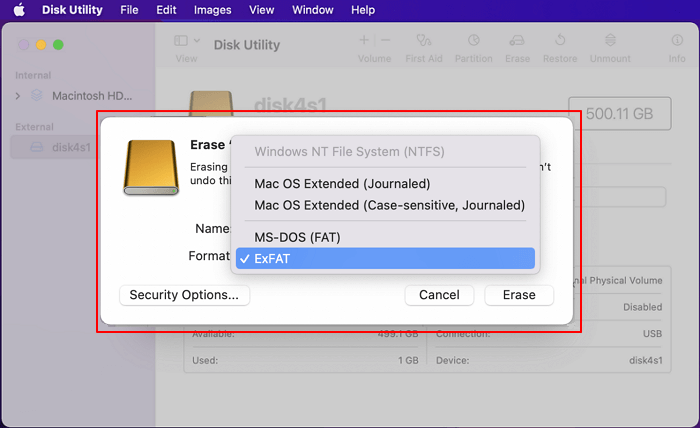
Choose the format and click on Erase.
Just by following these simple steps, you can quickly delete NTFS drive Mac Big Sur.
It is a pain in the neck if you cannot transfer or edit your files from your NTFS drive on your Mac devices. It is also frustrating that you can not read, write, delete or edit files on your drive, as you were unaware that they are NTFS formatted.
Depending on the situation, you can select an external drive format. A Mac's operating system is usually in NTFS format. NTFS is suggested for data security. It ensures the safety of files and formats. It also offers the ability to create hard links and a change journal. You will need to utilize a third-party utility to acquire write access in NTFS.
FAT32 can be used on old computers and game consoles. It contains a restriction that no single file should be larger than 4 GB. The file name can only be up to 8 characters long. It is used to transfer older systems and devices, such as Microsoft's XBOX and Sony's PlayStation 3. You can use APFS for speed and ease. You can make all-flash storage more efficient.
APFS provides strong encryption, efficient directory sizing, space sharing capability. Only Mac High Sierra supports APFS. You can choose between these external drive formats based on your requirements. However, we recommend using EaseUS NTFS for an efficient and error-free approach.
EaseUS NTFS For Mac is super easy to use and is easily accessible. Most importantly, this software does not only let you delete, but it also allows you to read, write and edit your NTFS formatted drives, securing your data.
We have discussed two methods on this page that help you delete your NTFS files on Mac Big Sur. To conclude the topic, if you use the delete NTFS using the disk utility method, you might delete your NTFS drive, but you may lose some data during the process. Also, you need to create a proper backup of your data before following this method.
But if you use the EaseUS NTFS For Mac tool, it can easily format your drive by downloading and following the instructions mentioned.
Related Articles - ALSO ON EaseUS SOFTWARE
2023 Best NTFS for Mac Software Free Download
![]() Daisy/2023-11-07
Daisy/2023-11-07
Can Mac Write to NTFS, Yes! Your 2023 Full Tutorial
![]() Sherly/2023-11-07
Sherly/2023-11-07
What Is NTFS for Mac, Everything You Should Know About It
![]() Daisy/2023-11-07
Daisy/2023-11-07
How to Fix Can't Delete Files from USB on Mac | 2023 New
![]() Cici/2023-11-23
Cici/2023-11-23
Copyright © 2004 - 2023 EaseUS. All rights reserved.


