- Store
-
Support CenterGuides, License, ContactDownloadDownload installerChat SupportChat with a TechnicianPre-Sales InquiryChat with a Sales Rep
If you're wondering how to wipe a USB/Thumb drive in Windows 11/10, you've come to the right place. Let's explore all our options to delete data from a USB completely.

Table of Contents
| Workable Solutions | Step-by-step Troubleshooting |
|---|---|
| EaseUS BitWiper | Launch EaseUS BitWiper and click...Full steps |
| CMD | Command Prompt is the best match when typing cmd into the search box...Full steps |
Most users are likely to delete or format the USB drive to wipe it completely. However, a simple delete or formatting will not entirely remove data from the device. Any professional may readily recover the data using any data recovery solutions available on the market today.
Therefore, what can one do to completely wipe a USB/Thumb drive so that no one can recover the confidential data afterward? To assist you in deleting data from USB devices permanently and securely, we're going to show you two techniques that you can try out!
Yes, a USB drive can be erased, formatted, and reused, but it will have some consequences. All data drives/partitions and files will be deleted once you format your USB. Moreover, a USB drive has a limited life expectancy, meaning that you can erase/remove a flash drive within a range of 10,000 to 100,000 write/remove cycles- after which the USB drive will no longer be usable or have slow data transfer speeds. Here are some of the main reasons why you should wipe your USB to reuse it in the future:
Now that you know why you should wipe your USB Flash Drive, it's time to look for some tips one by one to wipe USB thump drives successfully.
Before you jump on and try to wipe off your USB Flash Drive, there are some things that you need to consider. There is a way to go about it, and it includes preparing your system in the following ways:
Whenever your data gets damaged or erased, several options are available to resolve the situation. However, if the contents of your flash drive do not appear on your computer, diagnosing the issue might be more difficult.
Hidden files aren't precisely an 'issue' for the operating system. Many system files, for example, are by default hidden from view. This implies that Windows will not automatically determine which files have been incorrectly hidden and display them due to this.
File Explorer also has the capability of displaying hidden files. If you don't like the thought of inputting commands into a terminal window, this may be a more convenient option. Here are the actions to take to do this.
Step 1: Navigate to the My Computer folder in File Explorer. It should be possible to see your USB drive from here.
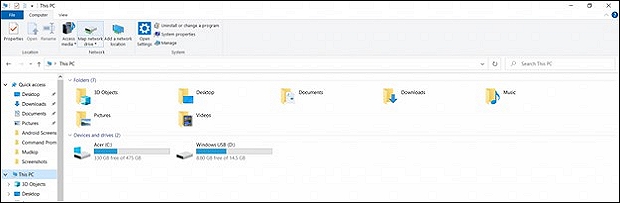
Step 2: When you double-click on the USB device, the device's contents will be shown. At this time, any hidden files cannot be accessed.
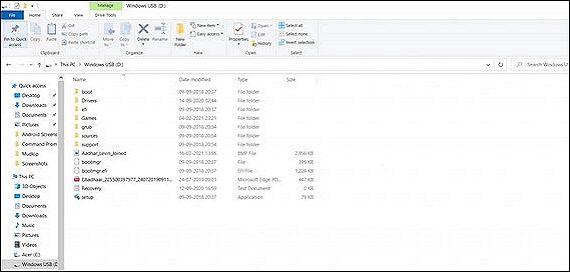
Step 3: Home, Share, View, and so on will all be located on the left-hand side of the window's uppermost section. To activate the Hidden items checkbox, go to the View tab and choose it. All previously concealed files and folders are now visible.

The majority of SD cards and USB Drives are equipped with a physical Lock Switch, which may be used to lock or unlock the USB Drive at any time. If you discover that your USB Drive is locked, you should first check the physical lock switch.
Unless the lock switch on your USB Drive has been toggled to the unlock position, you must toggle the lock switch to the lock position to unlock your USB Drive.
Transferring data from PCs to other devices is not difficult, and the procedure is quite basic and uncomplicated. It is unnecessary to have significant computer expertise to transfer computer data to a flash drive equipped with a USB interface.
Additionally, you should back up any critical data to another safe device or place before moving on to the next stage in the process.
Before you finally wipe the USB Flash Drive, one more thing that you need to do is to select a suitable method to Wipe a thumb drive. You have to select from two valuable methods:
Now, when you compare the two options, you need to consider some upsides and downsides. When it comes to third-party software, it can wipe the entire disk like HDD/SSDs. And that's not it. You can also wipe partitions that include OS drives.
Furthermore, third-party software allows you to shred multiple files or folders simultaneously. To get more insight into the two, look at the table below for more information.
Table 1.0
| Methods | Advantages | Disadvantages |
|---|---|---|
| Third-Party Software |
1. Straightforward process to wipe a thumb USB. 2. Offering multiple features for the ease of the user. 3. Multiple files and folders can be erased simultaneously, something you can't have with the CMD |
The only disadvantage is that you will have to download the software, which will take some space on your OS. |
| CMD |
1. Unlike other interfaces, this one doesn't need as much CPU processing time. To fix a typing error, you'll usually have to start again from the beginning. 2. An inexpensive, low-resolution display may be used in conjunction with this interface. |
1. It is necessary to type commands precisely. The command will fail if there is a misspelling. 2. When you input an instruction incorrectly, you may have to start again. |
Since you have two options to wipe a thumb drive, we have compiled a step-by-step guide to give you a better perspective.
When you remove files from your computer or even empty the Recycle Bin, the information is not entirely erased from the system. You can't access it because the operating system has flagged it as unreachable since you've just erased the reference to it.
All of the removed information, on the other hand, remains intact. In other words, unless you erase the entire contents of the device, you may still recover the data using file recovery software.
So be cautious when you permanently delete files that include personal information, bank account information, credit card, number information, correspondence, and other information. EaseUS BitWiper is a data wiping utility that offers various erasing options.
Some of the main features of the EaseUS BitWiper are:
Now, follow the steps below to wipe a thumb drive using EaseUS BitWiper:
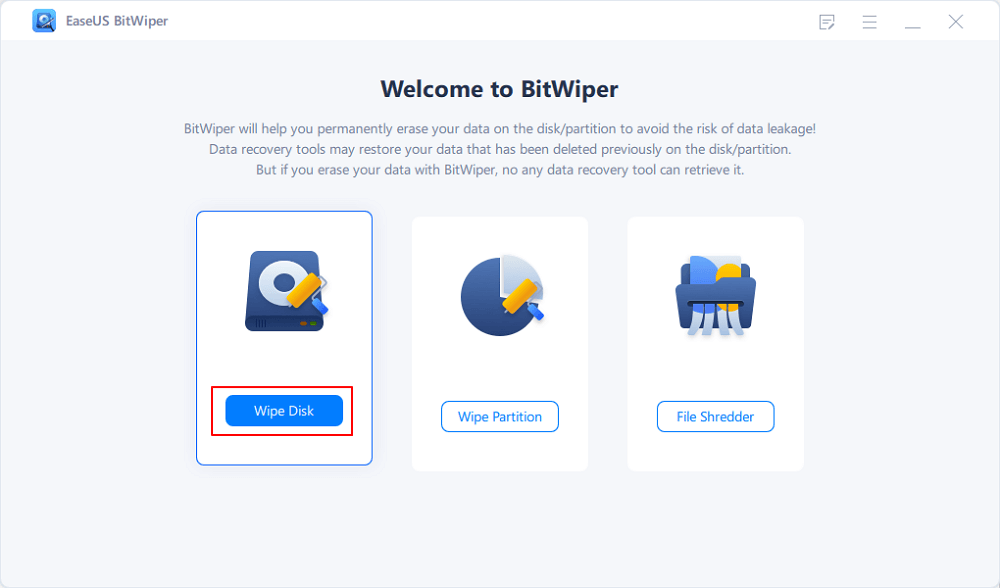
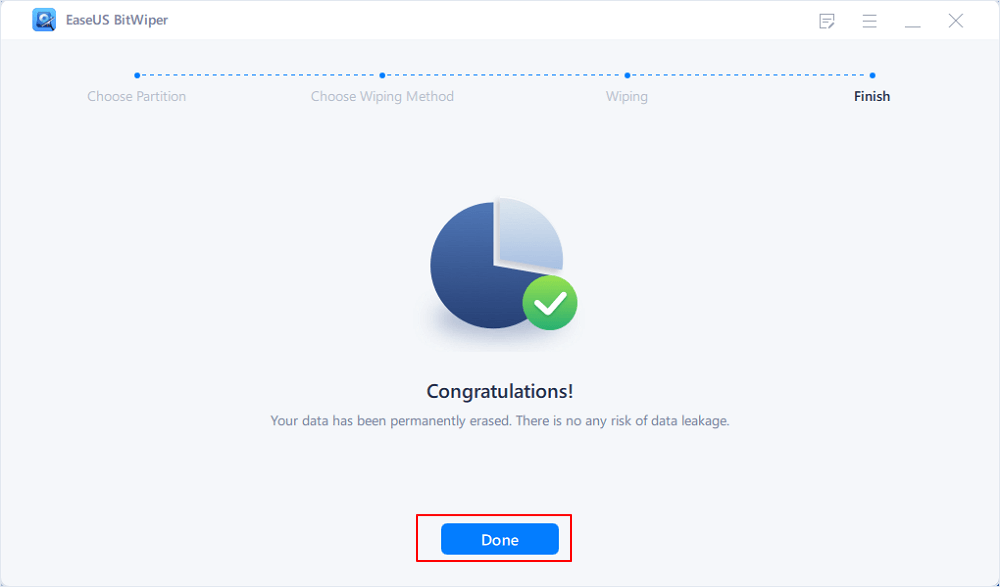
Step 1. Open EaseUS BitWiper and then select "Wipe Disk."
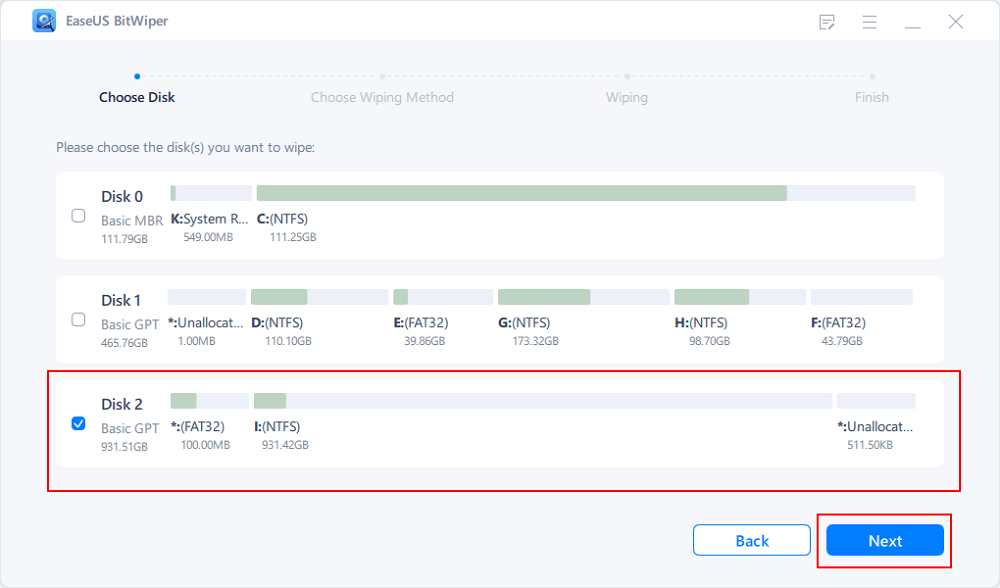
Step 2. Choose the external (Or USB, SD, Memory) hard drive to wipe. Then click "Next."
Important: Make sure you have chosen the targeted external disk. The data is irrecoverable.
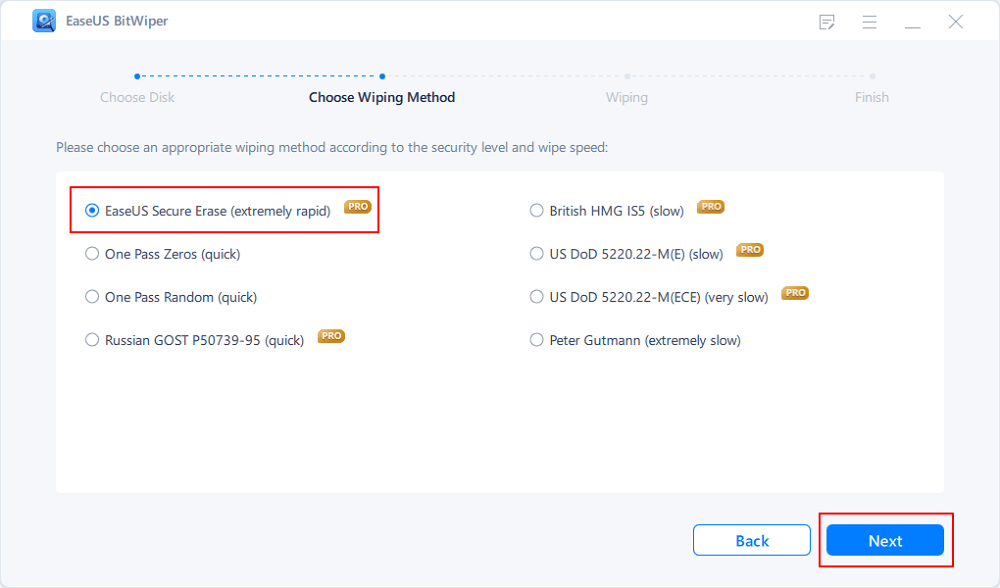
Step 3. Choose the proper wiping method based on the security level and wipe speed. And then click "Next."
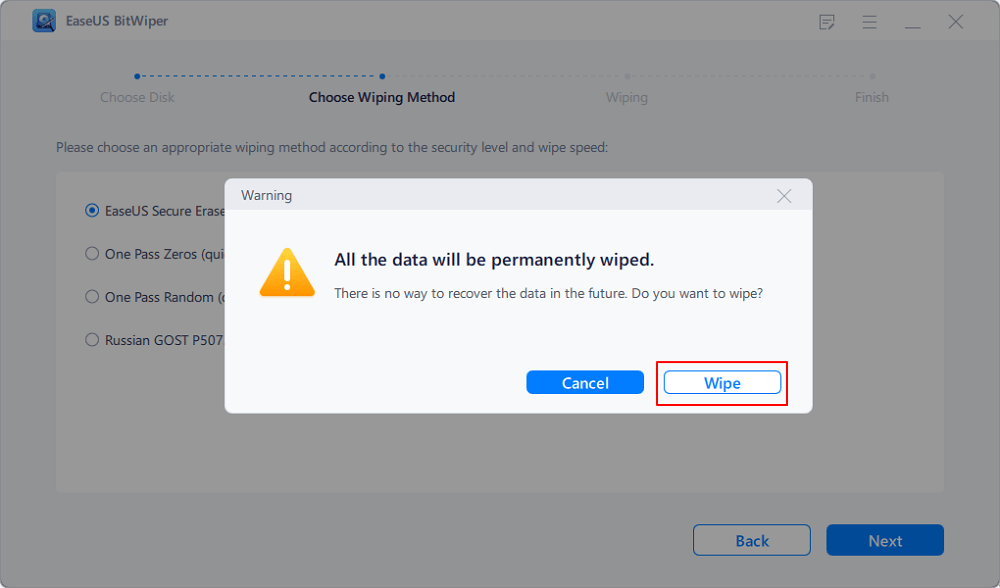
Step 4. Confirm the Warning message and then select "Wipe."
Step 5. Wait for the wiping process to complete.
To ensure that you don't lose any of your data, be sure to back up all of your crucial files. Each of these eight procedures will take a few minutes to complete depending on how much space and capacity your USB flash drive has to work with. Windows 10 PC is used for the following stages.)
Step 1: Command Prompt is the best match when typing cmd into the search box. Select Run as administrator when you right-click on it.
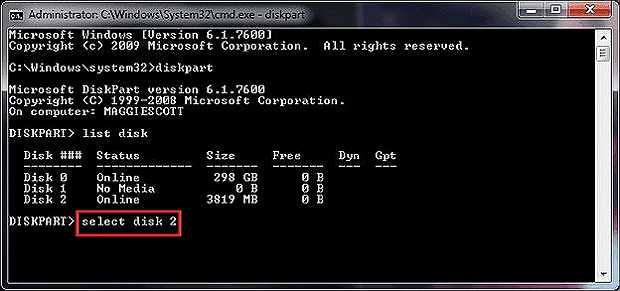
Step 2: Type diskpart in the Command Prompt window and hit Enter.

Step 3: Type list disk and press Enter. Check to see which disk is your USB flash drive using the list of disk information. Disk 2 is a good example.

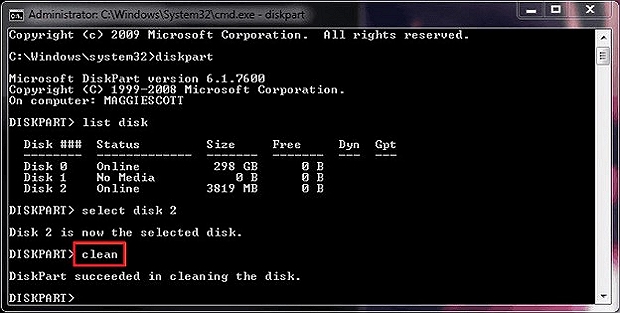
Step 4: Press Enter to choose disk 2 and enter select disk 2.
Step 5: Type clean. You'll have to wait a few minutes while the disk is being erased.
Step 6: Once you've entered the command, hit Enter.

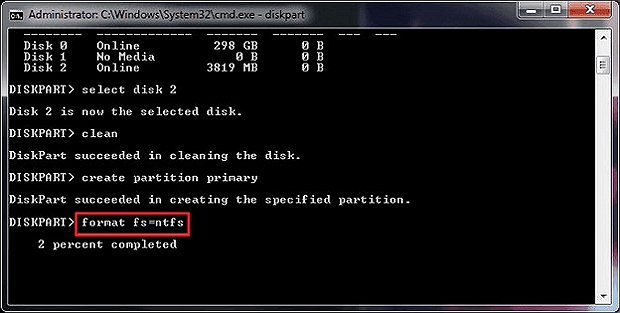
Step 7: Finally, click Enter to begin the process of formatting your newly formed partition as an NFS file system. If you'd instead use another file system format, such as fat32 or exfat, substitute the command ntfs with the preferred one.
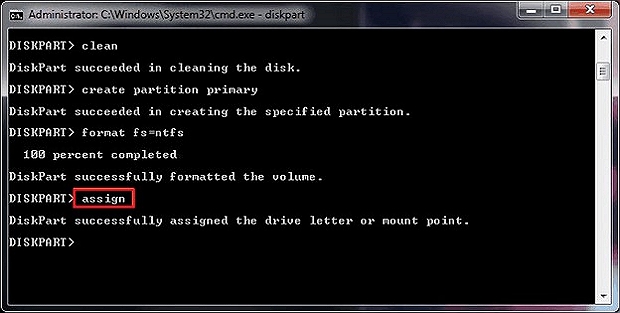
Step 8: To give the flash drive a drive letter, enter assign.
Well, there you have it – a complete guide on wiping a thumb drive. We hope the methods described above were helpful in your quest to wipe your USB.
Remember to plug and unplug the USB appropriately. FAT32 - 32GB or smaller, or exFAT - 64GB or more extensive, is a suitable file system for USB drives. We highly recommend using EaseUS BitWiper to help wipe USB/Thumb drive because the software is easy to use and provides multiple benefits.
Related Articles - ALSO ON EaseUS SOFTWARE
How to Clean or Wipe a Hard Drive Including The OS
![]() Banu/2025-04-15
Banu/2025-04-15
Why Is Disk Cleanup Not Deleting Files and How to Fix It
![]() Banu/2025-04-15
Banu/2025-04-15
How to Securely Erase SD Card? 2025 Full Guide
![]() Banu/2025-04-15
Banu/2025-04-15
Can You Wipe Free Space on an SSD [2023 Full Guide]
![]() Daisy/2025-04-15
Daisy/2025-04-15
Copyright © 2004 - 2023 EaseUS. All rights reserved.