- Store
-
Support CenterGuides, License, ContactDownloadDownload installerChat SupportChat with a TechnicianPre-Sales InquiryChat with a Sales Rep
You often come across errors or warnings when deleting files via Disk Cleanup. So, how do you get the better of them? Here, read the detailed tips on fixing the 'Disk Cleanup Not Deleting Files' Error in 2024 to get going!

Table of Contents
Disk Cleanup is a Windows tool that may be used to remove unwanted and garbage data from drives to make your computer perform more quickly. In addition, since Disk Cleanup is a widely used application, Disk Cleanup not functioning correctly on Windows 10/8/7 is a common issue encountered by Windows users.
Disk Cleanup may fail to react or stall occasionally, or it may fail to erase or delete data. What should you do if you find yourself in one of these situations? The best way to get Disk Cleanup files to operate correctly is to fix them.
But how do you fix them? Is the real question here. And before fixing them, it's essential to understand why such problems arise. Therefore, this article will cover all the Full Tips on Fixing 'Disk Cleanup Not Deleting Files' Error in 2024. Let's get started!
| Workable Solutions | Step-by-step Troubleshooting |
|---|---|
| Fix 1. Log In as Administrator and Retry Disk Cleanup | Step 1: Windows 10's Cortana search bar may be used to input cmd into the Start Menu...Full steps |
| Fix 2. Gain Full Permission to Delete Files | Step 1: Launch the File Explorer application...Full steps |
| Fix 3. Unlock or Turn Off BitLocker Partition | Step 1: To launch the Windows 10 Settings window, use the Windows + I...Full steps |
| Fix 4. Delete Files With Disk Cleanup | Step 1: Right-click on your "C" disk in "File Explorer," then choose "Properties...Full steps |
| Fix 5. Clean Files That Disk Cleanup Can't Delete | Step 1. Launch EaseUS BitWiper and click "File Shredder"...Full steps |
Before we get into the grand scheme of things, you need to understand the errors and symptoms that arise when using Disk Cleanup. Here, we have outlined the potential "Warning" messages that display on your screen when deleting files via Disk Cleanup and their reasons.
Third-party applications which you have installed on your computer may potentially be a contributing factor in the occurrence of the problem.
Because the Disk Cleanup program is a built-in program, it needs the presence of file systems in order to function properly. When your storage media or other files are corrupt or misplaced, on the other hand, this might result in the problem arising.
When deleting files, many of you might have come across this. So, what do you think about it? We know the answer to it. That is why we have compiled this comprehensive guide to solve this recurring problem. Follow the procedure here and then apply it at your end.
As an ordinary user, if you attempt to remove a folder, you'll get a notice: "You'll need to provide administrator permission to delete this folder."
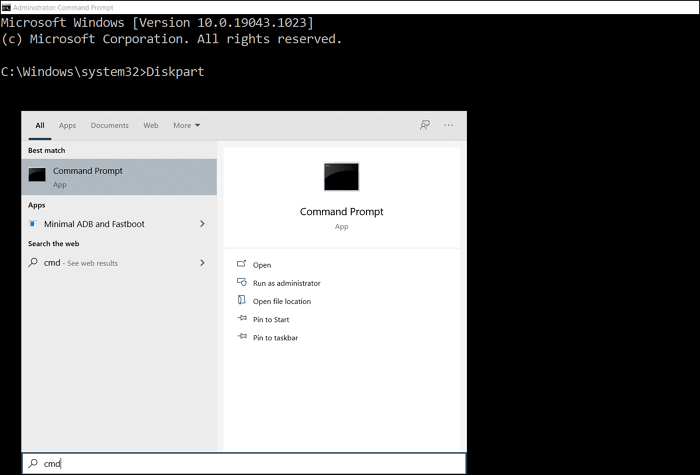
In Windows 10, the Command Prompt technique is the quickest and easiest way to log in as an administrator. Perform these steps to put this approach to use:
Step 1: Windows 10's Cortana search bar may be used to input cmd into the Start Menu. The Cortana search box may also be accessed by pressing Windows logo + S on your keyboard. The following is an illustration:
Step 2: If Command Prompt appears in the search results, right-click and pick "Run as administrator" from the drop-down menu.
Step 3: Upon choosing the "Run as Administrator" choice, a dialog window will pop up. To continue, choose "YES" from the drop-down menu.
(Note: After pressing the "Yes" option, the Administrator command prompt would be displayed. Press "Enter" to execute the command net user administrator /active: yes.)
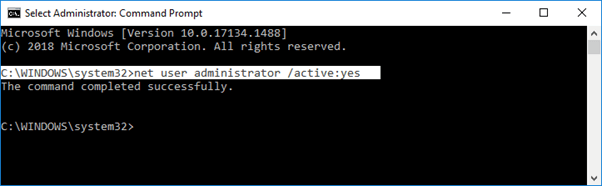
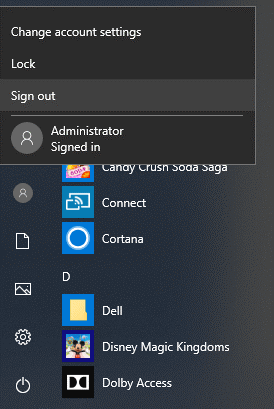
Step 4: The command has been successfully executed. It is now possible to access the default Windows 10 administrator account, although it is no longer secured by a password. To see whether it's there, go to the Start settings. Select it.
As for this problem, you will have to gain full permission to delete files of your own choice. Here's how you can do that:
Step 1: Launch the File Explorer application.
Step 2: Find the file or folder you want full access to and click on it.
Step 3: Using your right mouse button, go to "Properties."
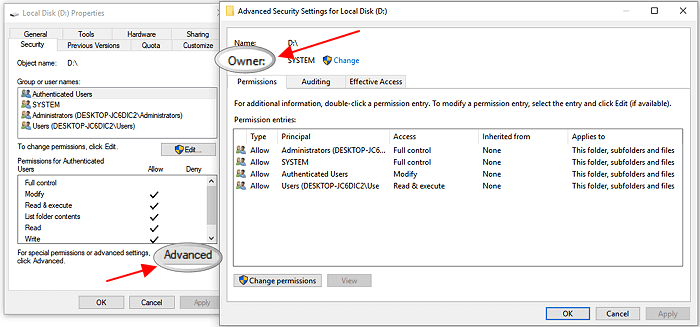
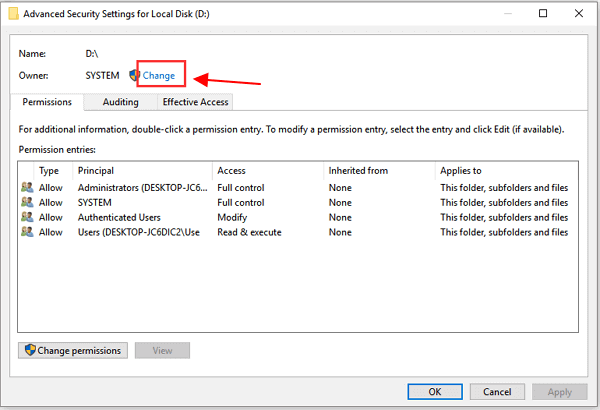
Step 4: To see the NTFS permissions, go to the Security tab.
Step 5: The Advanced option may be accessed by clicking on it.
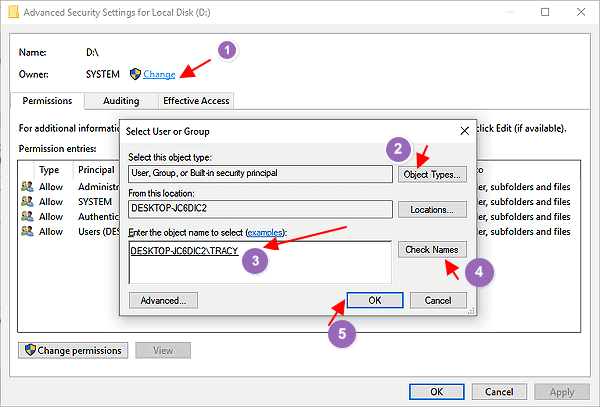
Step 6: On the "Advanced Security Settings" page, you must click the Change link under the Owner's box. Take a look at the options, then.
Step 7: Click on the "Find Now" button to search for a user or a group.
Step 8: Choose your user account from the search results and press OK.
Step 9: Select OK on the "Select User or Group" box.
Step 10: Click OK to Apply your changes.
Step 11: Repeat the process. To finish this activity, click OK one more time.
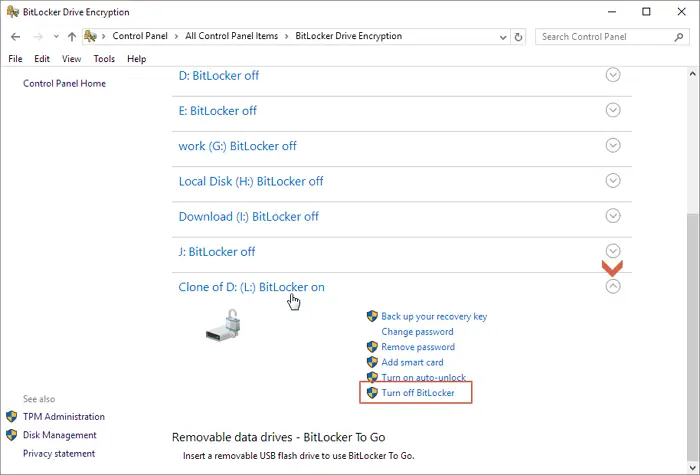
Bitlocker is not a necessary tool for most users, but it is a highly effective tool for protecting your data with a secret password. This is why, at times, it becomes hard to delete files because the BitLocker Partition is locked. Therefore, follow the steps below to learn how to unlock it:
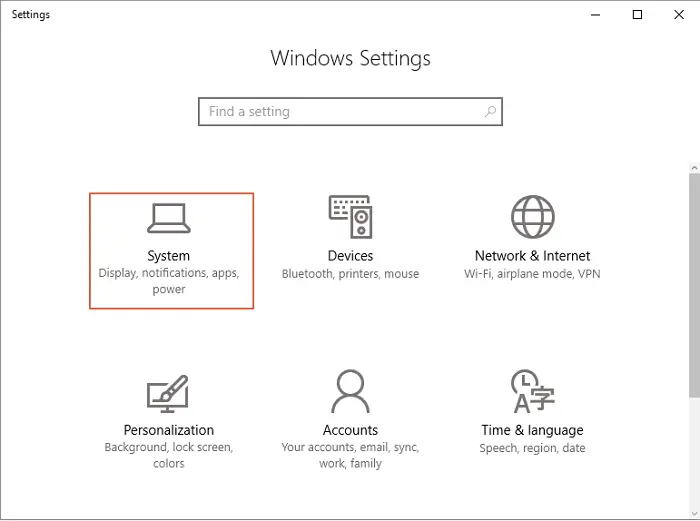
Step 1: To launch the Windows 10 Settings window, use the Windows + I key combination.
Step 2: Select the System option from the drop-down menu.
Step 3: Continue by selecting the About option at the bottom of the left-hand menu and then BitLocker settings on the right-hand menu.
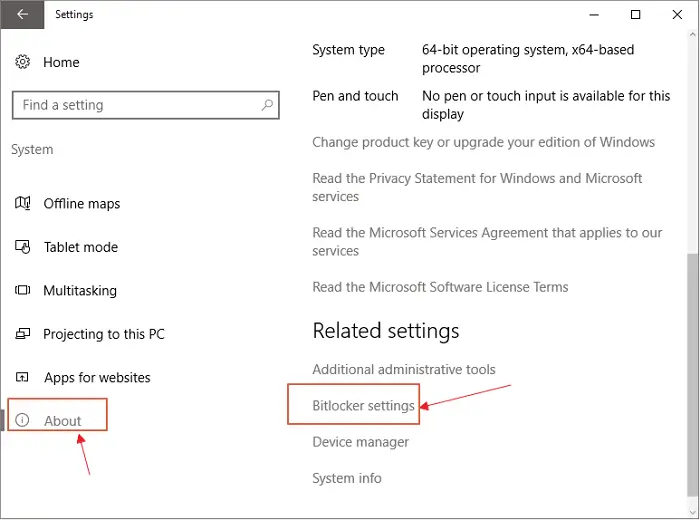
Step 4: To unlock an encrypted disk, choose it. This should display the [BitLocker Drive Encryption] box and then you can select to turn of bitlocker drives on your own.
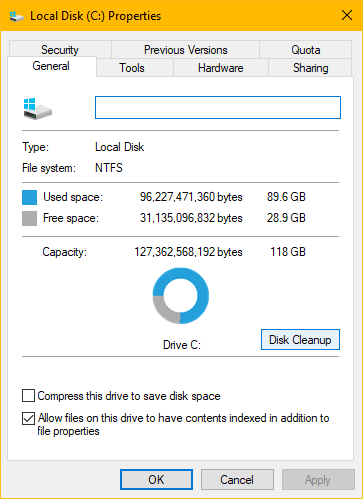
So, now? How would you delete files using the Disk Cleanup? To follow the simple steps where you have to select the files you want to delete, look below:
Step 1: Right-click on your "C" disk in "File Explorer," then choose "Properties" from the drop-down menu.
Step 2: Select "Disk Cleanup" from the drop-down menu.
Step 3: Select all of the items listed under "Files to remove." Then click on the "OK" button.
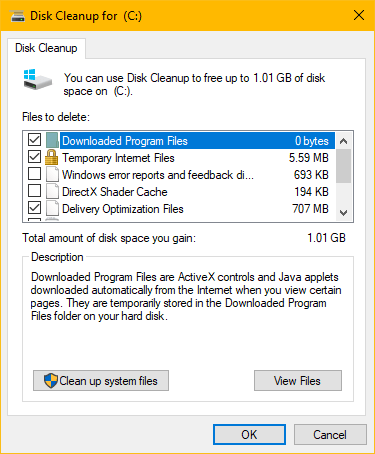
Step 4: Delete the files that you have chosen.
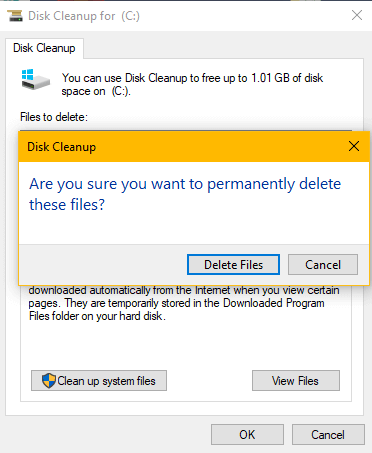
Step 5: Select "OK" from the menu once the process is completed.
When you remove a file from your computer using the simple delete function, Shit+Delete keys, emptying the Recycle Bin, or even formatting a hard disk, it keeps existing on your hard drive and enables users to restore data for some reason.
The question is, how do you permanently erase files such that they are not recoverable?
You must wipe and erase your computer to permanently eliminate data from your PC or laptop without the ability to restore them. Data that has been irreversibly erased can no longer be retrieved in this manner.
Although Windows does not provide a built-in application for scanning and wiping your hard drive for deleted items, excellent software is available that can do this task.
EaseUS BitWiper includes a "File Shredder" function to wipe all disk data files in Windows 11/10/8/7. It can assist you in fully deleting all of the data and partitions on your hard drive using solutions that satisfy DoD 5220.22-M Wiping Standard.
Overwriting old data with new data is used to wipe off all of the data on your partition totally, and it is the most common method of doing so. Follow the steps below to gets started:
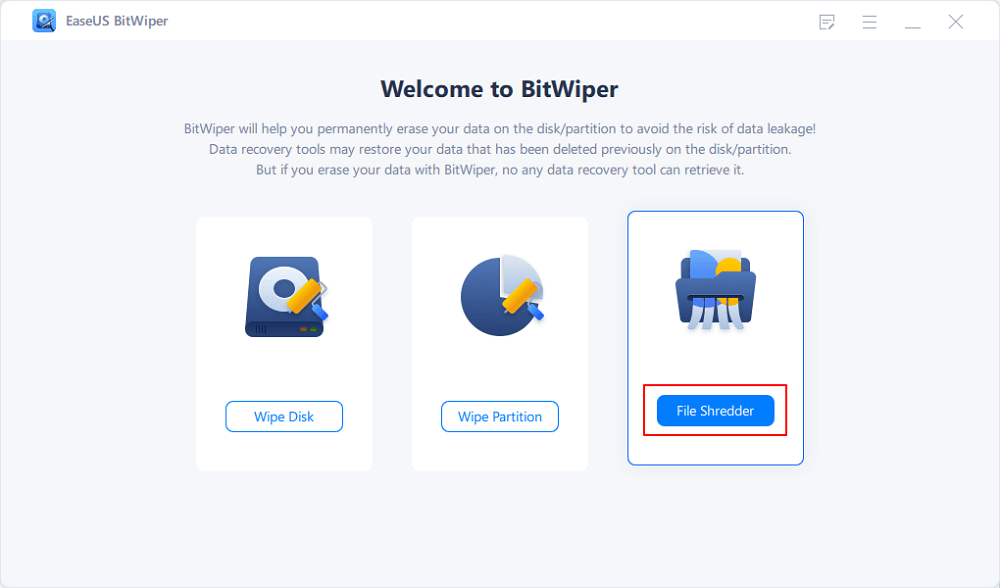
Step 1. Launch EaseUS BitWiper and click "File Shredder".
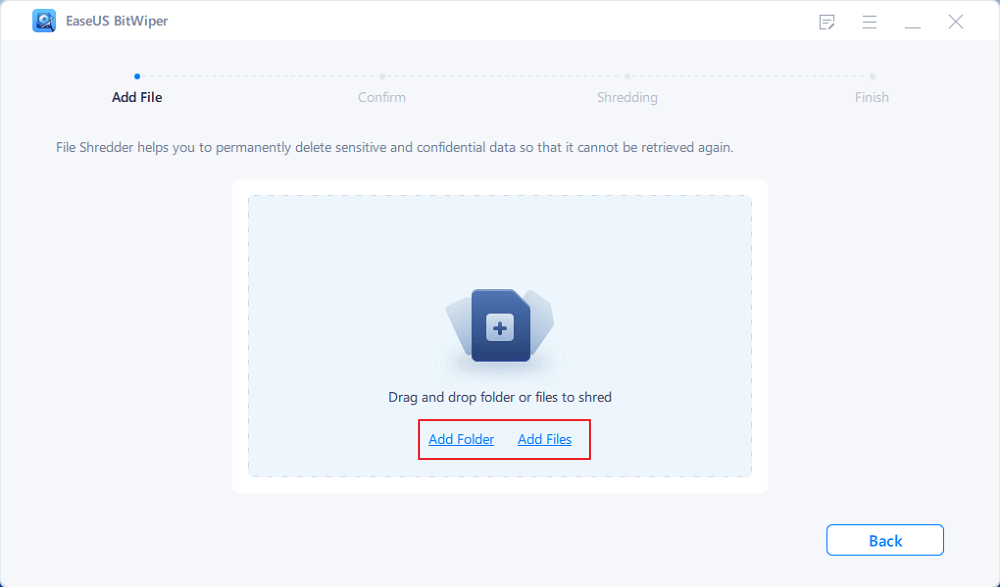
Step 2. Click "Add Files" to select the files you need to shred, or you can drag files, documents, images, music files, etc., into the center area.
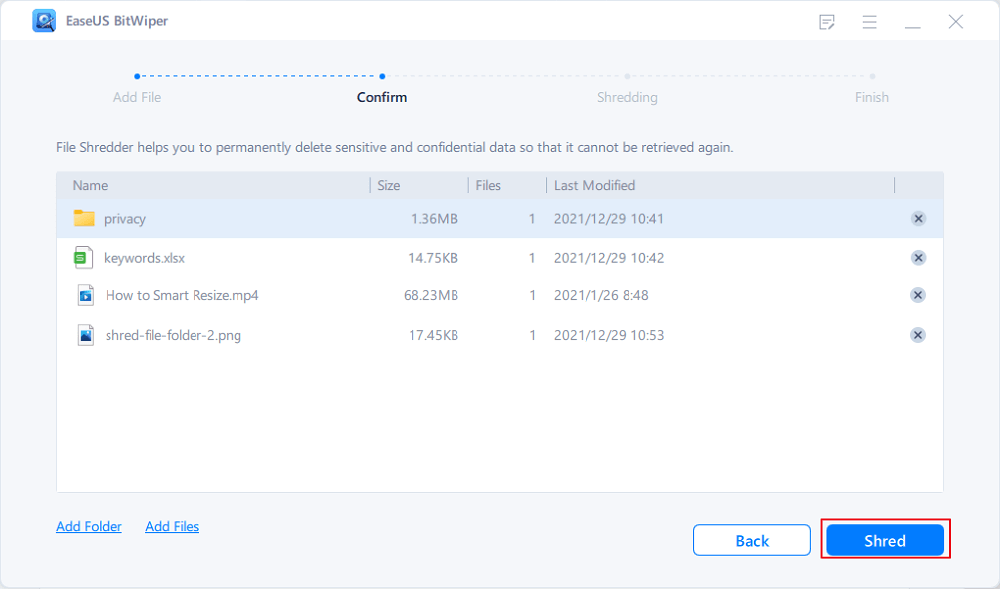
Step 3. Re-select files that you need to shred and click "Shred" to confirm.
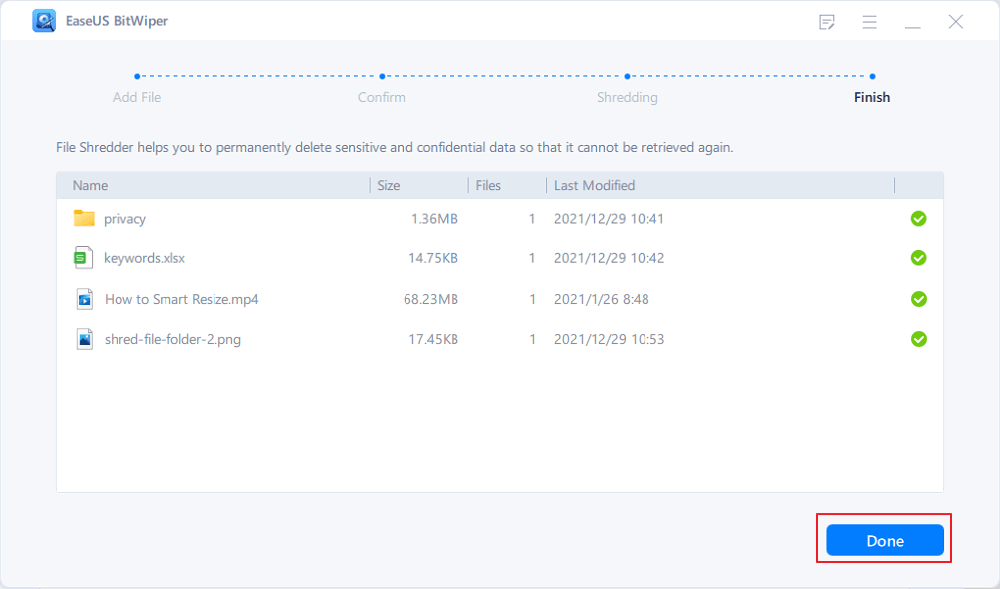
Step 4. The program will immediately shred all the selected files. When it finishes, click "Done".
EaseUS BitWiper covers featured "Wipe Disk" function that helps you securely erase SSD/HHD files from your laptop or PC with ease. One other popular feature seems to be the "Wipe Partition," which allows you to wipe all partition data completely.
Note: If you'd want to erase your hard drive several times, EaseUS disk wipe software may help. After two erases, your data is usually lost forever and can't be retrieved.
We understand the potential problems you may face while using Disk Cleanup. That's why we decided to cover the most prevalent and recurring errors you come across and decide to offer you the Full Tips on Fixing 'Disk Cleanup Not Deleting Files' Error in 2024. Hopefully, by now, you will be fully equipped to perform all the methods and their steps to delete any of your files from the PC. Good luck
Related Articles - ALSO ON EaseUS SOFTWARE
How to Wipe a Windows XP Computer Completely in 2026
![]() Banu/2026-01-05
Banu/2026-01-05
How to Securely Erase SD Card? 2026 Full Guide
![]() Banu/2026-01-05
Banu/2026-01-05
7 Best Free Hard Drive Wipe Software Free Download for Windows 11/10
![]() Banu/2025-11-11
Banu/2025-11-11
How to Make SSD Data Unrecoverable [2026 Full Guide]
![]() Banu/2026-01-05
Banu/2026-01-05
Copyright © 2004 - 2023 EaseUS. All rights reserved.