- Products
- Store
- Partner
-
Support
Support CenterGuides, License, ContactDownloadDownload installerChat SupportChat with a TechnicianPre-Sales InquiryChat with a Sales Rep
Table of Contents
By cleaning the data on your hard drive, you are only deleting the data reference where it should be, such that you cannot find it. This means recovering lost data and wiping data using hard drive wipe software. It is not only about wiping data from your hard drive using free software that does the trick. Before using any hard drive wipe software, ensure that your data are adequately secured when you begin wiping data from your hard drive. Back up data by saving them as it may be impossible to undo the process.
In addition, you should de-authorize the software you used on that device. Your system's identification number is saved for every site you visit and every software you use. Also, use a cleaner to avoid junk files, browsing history, and other slack data before wiping your hard drive using any software. The whole process of wiping information and data from your hard drive isn't a hard one. You can follow through with the steps listed in the article.
| Workable Solutions | Step-by-step Troubleshooting |
|---|---|
| Fix 1. EaseUS BitWiper | EaseUS BitWiper has a whole lot of unique features designed to wipe data, partitions...Full steps |
| Fix 2. CMD Clean All | One can use Windows 11/10 built-in command prompt which allows users to execute wipe on hard disk...Full steps |
| Fix 3. DBAN | DBAN is a BIOS interface disk wipe tool suitable for advanced functions...Full steps |
| Fix 4. KillDisk | With the KillDisk, you can erase all data in the hard drive or partition them...Full steps |
Whatever be your reason for wiping data on your hard drive, you can perform a secure wipe for free. There are a plethora of software programs to use. However, the question is, how reliable are they? You don't want anyone to retrieve data after deleting it, and this is why it is paramount that you use the recommended software listed below. All you need to do is download and try.
One important thing to know is that wiping your hard disk isn't only done when you want to change your system or sell it for another. It can help you to increase your system's speed. By backing up essential data, you prevent losing it when wiping your hard drive/disk.
There are some things to look out for when choosing the software to wipe your hard drive. These features are necessary for their use and may be able to salvage a situation. Let's take a look at the above-listed software comparison with these criteria:
1. Disk Wipe: The Disk Wipe feature is common to all of the free hard drive wipe software listed below. Notwithstanding, some of them, such as the CCleaner DBAN, may not wipe data entirely because you may recover it. The DBAN software does not erase SSD.
2. Wipe OS Disk: The KillDisk hard drive wipe software enables this feature.
3. SSD Secure Erase: The EaseUS Bit Wiper possesses this feature. It can wipe data on SSDs, even HDDs, and external devices such as USBs. However, the disadvantage is that one may need to download the higher version for advanced features, which are not free.
4. Partition Wipe: The WipeDisk, KillDisk, and EaseUS Bit Wiper have features that wholly erase and wipe data in partitions.
5. Wipe Free Space: Hard drive wipe software such as Reset This PC and CCleaner have standard cleaning features and can wipe data till there are free spaces in the hard drive.
With the above comparisons, you can tell that the EaseUS BitWiper has a whole lot of unique features designed to wipe data, partitions, and also shred files, folders and documents on all storage devices. It supports wiping external drives such as HDD, SDD, OS drive, SD card, and USB drive. This EaseUS BitWiper can function on Windows 7, 8, 8.1, 10, 11, and servers from 2011-2022.
Steps to Wipe Hard Drive for Free:
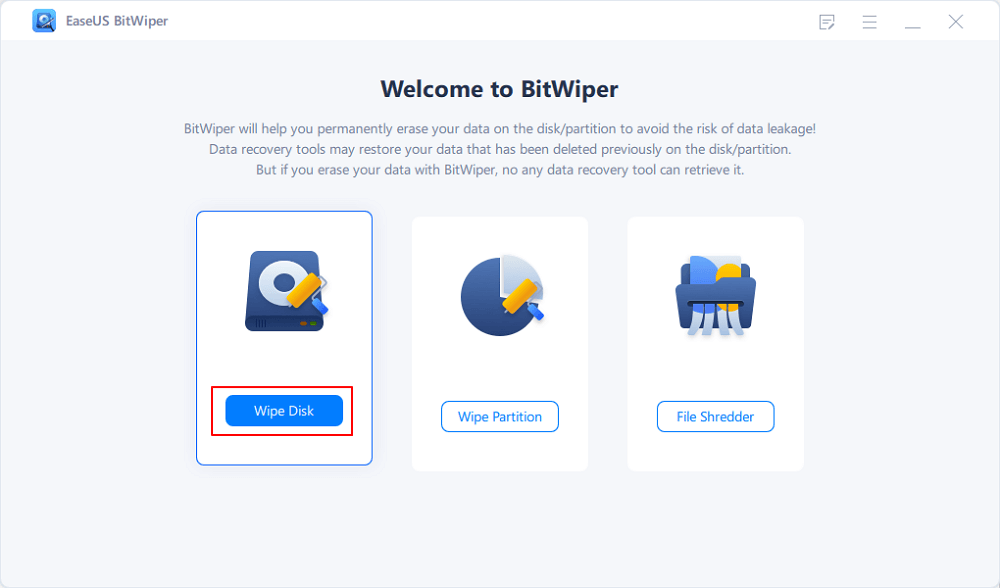
Step 1. Run EaseUS BitWiper. Click the "Wipe Disk" tab.
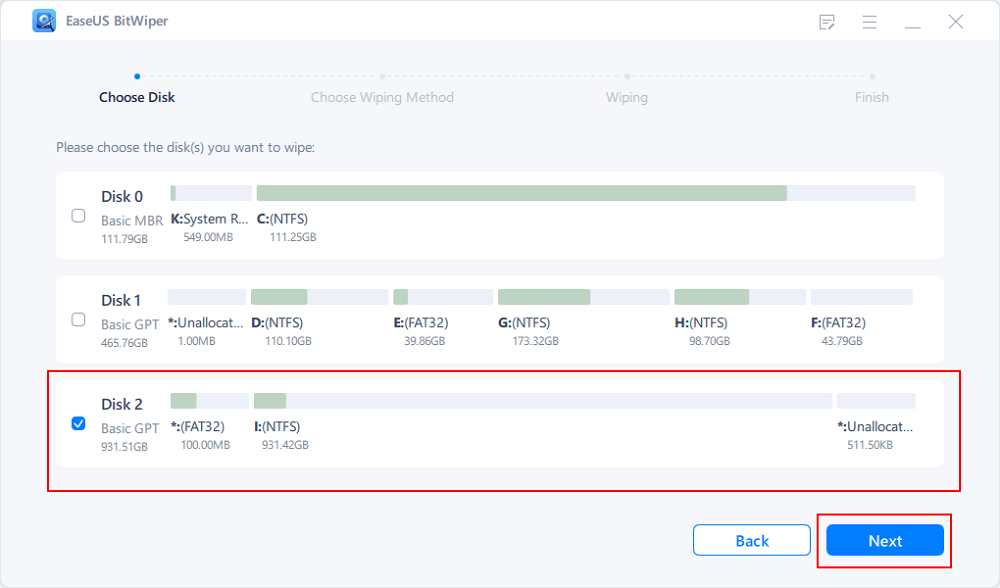
Step 2. Select the targeted HDD or SSD to wipe.
Notice: Please make sure you have chosen the correct HDD or SSD. Once the wiping starts, your data is irrecoverable.
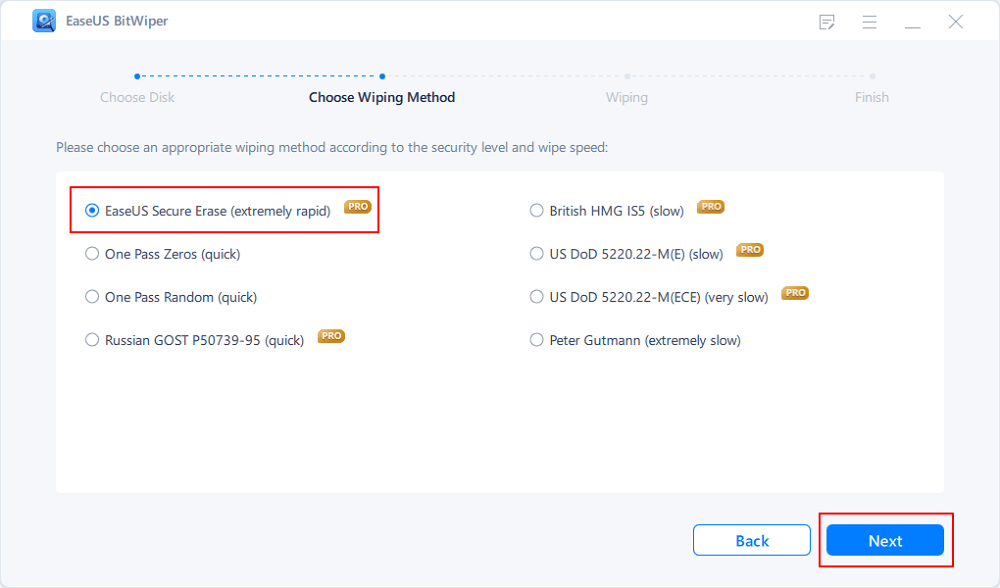
Step 3. Choose Wiping Method and click "Next."
Choose a suitable wiping method. Recommend EaseUS Secure Erase!
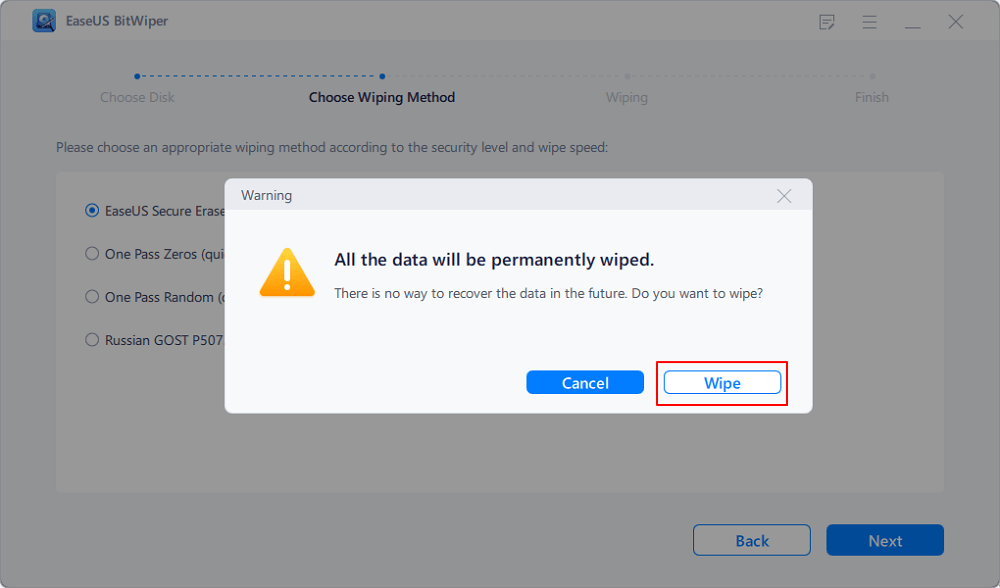
Step 4. Check the warning message and click "Wipe" to confirm.
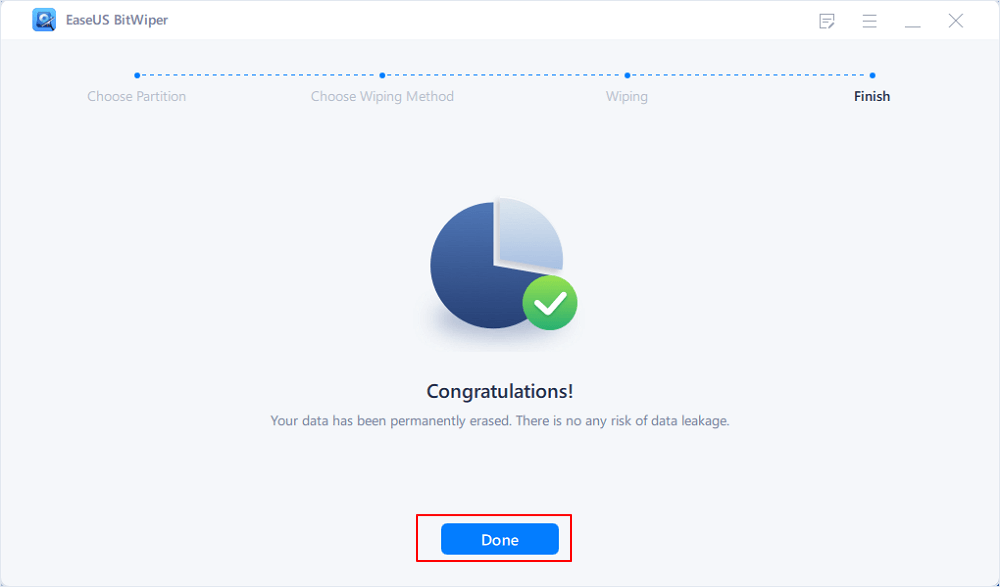
Step 5. Wait for wiping finish and click "Done."
One can use Windows 11/10 built-in command prompt to clean. This Windows free tool allows users to execute a wipe on the hard disk with command prompt line syntax.
How to Wipe Hard Drive via CMD:
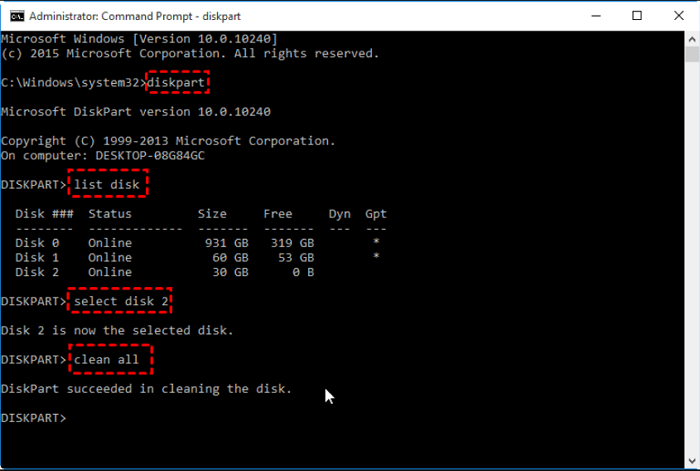
Firstly, open the command prompt and then press Windows + R simultaneously. Afterwards, input "CMD" in the Run box and press Enter. In the windows, type "diskpart," then follow these steps:
Step 1: Open Command Prompt as Administrator
Step 2: Use Diskpart and press the enter button.
Step 3: List disks i.e, all disks on your computer
Step 4: Select disk 1, 2, 3
Step 5: Clean all: Delete all data
Remember that if you want to wipe an OS drive, you can turn to the first method, which is the use of EaseUS BitWiper.
DBAN is a BIOS interface disk wipe tool suitable for advanced functions. To use DBAN, you'd have to create a bootable media, usually a bootable USB.
Steps to Erase Hard Drive:
Step 1: Download DBAN
Step 2: Write/burn it to a USB.
Step 3: Connect the USB to the computer.
Step 4: Change the boot order from BIOS to boot from USB.
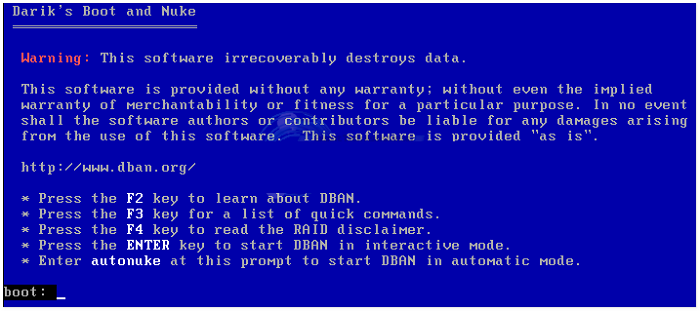
Note that DBAN may be complicated in its use, and this is why we recommend that users who are not conversant with its operations try other methods listed above or below.
With the KillDisk, you can erase all data in the hard drive or partition it. The free version of this software only allows the One Pass Zeros erasure, and you may need to pay for the higher version for more erasing features.
How to Erase Hard Drive using KillDisk:
Step 1: Point at the drive you want to erase.
Step 2: Select the Check box for this hard drive/disk.
Step 3: Press F10 or click “kill” on the toolbar.
Step 4: The kill dialogue box will appear. Select an erase method.
Step 5: Set other parameters for erasing and continue.
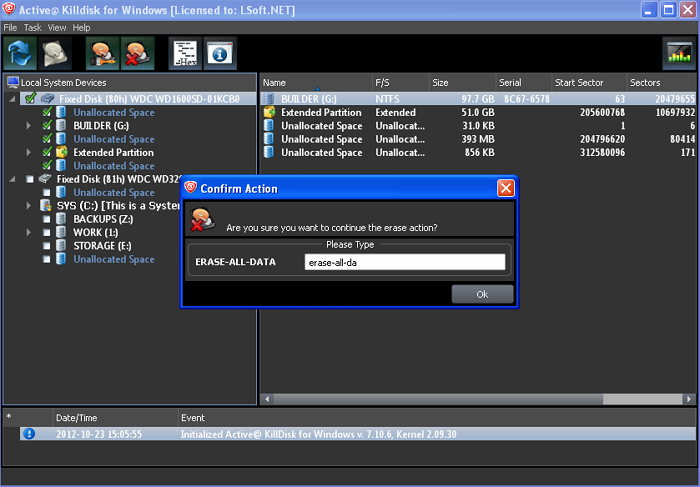
Step 6: Click on start and confirm action
Step 7: Type "Erase all data" and click on "yes/erase".
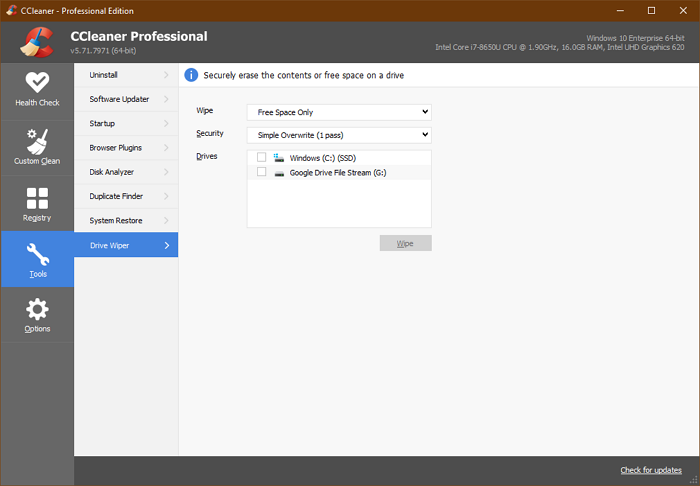
Although it lacks professionalism and algorithms, CCleaner can help wipe your hard drive. With the CCleaner, you can set erasing times for a disk.
How-to-Guide on Erasing Disk via CCleaner:
Step 1: Download the CCleaner App.
Step 2: Go to the CCleaner App.
Step 3: Click on "tools".
Step 4: Go to "Drive Wiper".
Step 5: Select "Entire Drive" which will appear on the drop down box on the menu screen.
This portable disk wipe freeware enables you to wipe data on your hard drive securely.
Step-by-Step Guide for Erasing Disk
Step 1: Launch the program and click on "Wipe Disk" from the right-click menu.
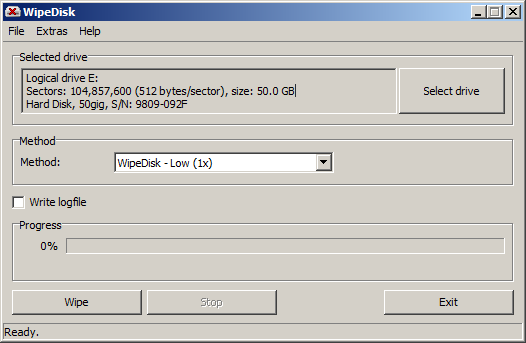
Step 2: Five wiping methods will be listed; choose one and click on OK.
Step 3: Click on the Apply button to affect all changes made.
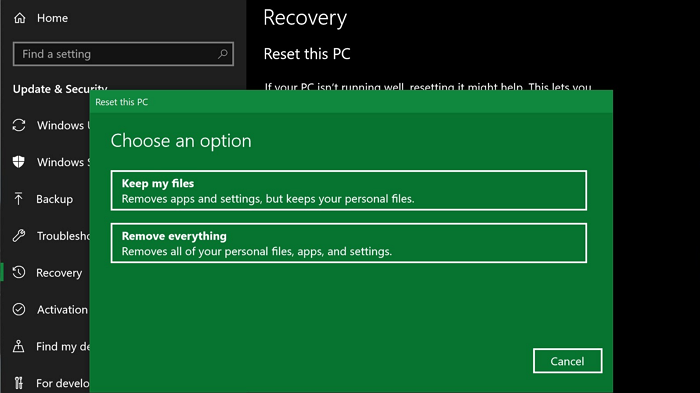
Although this method is the last, it is still instrumental in wiping/erasing your system’s hard drive. This tool works only on OS drives by resetting the disk but keeping the OS usable and intact.
How to Use It for Disk Erasing:
Step 1: Click on the START button and click on SETTINGS.
Step 2: Under that, click on UPDATE & SECURITY.
Step 3: By the left, click on RECOVERY > Reset PC.
Step 4: You'll see the Reset this PC section. Click on Get Started.
Step 5: Click on DELETE EVERYTHING.
In summary, wiping a hard disk may seem complicated, but just as you can see in the steps gradually presented with pictures, you can get it done as a user without incurring any cost. If you want to wipe the OS disk, turn to the EaseUS BitWiper with its wipe disk features. On the other hand, if you want to clean data on your drive, Clean All or WipeDisk are good options.
Related Articles - ALSO ON EaseUS SOFTWARE
What Is DiskPart Clean and Everything You Need to Know
![]() Banu/2025-04-15
Banu/2025-04-15
How to Clean a Disk Using CMD [2025 New Guide]
![]() Banu/2025-04-15
Banu/2025-04-15
How to Secure Wipe Hard Drive for Free? 2025 Newest Guide Is Here
![]() Banu/2025-04-15
Banu/2025-04-15
How to Securely Erase SD Card? 2025 Full Guide
![]() Banu/2025-11-11
Banu/2025-11-11
